|
My 2002 V6 Camry was coming up on 90,000 miles, meaning it was time tochange the timing belt. So i gathered the parts and tools - water pumpand idlers too, and got to it. It took me about 5 hours for all ofthis. Here are some tips on how to change your V6 timing belt. this was the first time i ever changed a timing belt on a V6. I hadsome trouble with doing it, and ihave described them so hopefully youcan avoid the problems i had. But when the time came to do the timingbelt on my Solara V6, since i had done it before this time, it wasactually easy and only took me two hours. So try not to get frustratedand give up if you hit a few snags in your install, i did it, you cantoo. (This post is for V6 Camrys but if you own a Solara, the V6 on it is alittle different - but the differences are not significant. I did my2001 Solara timing belt yesterday (February 7, 2008) so i have includeda paragraph at the very end of this post about it.) I suggest to read this post all the way through before you start. IMPORTANT TIP #1: One thing to bear in mind from the get-go:there is alot of confusion sometimes about lining up the new belt markswith the dots on all the pulleys, as shown in STEP 9 below. Lining upthe marks is really not hard to do BUT it means the difference betweena smooth belt install or a frustrating debacle for you. I dont want to intimidate anybody but remember the new timing belt mustbe on perfectly. By perfectly it means you cannot be one or two teethoff - or your car will run wrong, or not at all. Its not hard to get itright the first time, its just a matter of being careful, and there's afew simple things you can do to make sure you do it right. An important thing is not to get confused about where the white stripeson the belt should be. So remember: Install the belt using the timingbelt marks printed on it by the manufacturer. Line up all the dots andmarks on the pulleys, along with the white strips on the new belt.Double check them. Install belt tensioner (photo 5). And once you have done all this, forget the belt markings, because they no longer are a reference to anything you will be doing from this point forward. (Because - Onceyour new belt is on and the crank is turned one or more turns - onlythe marks on the pulleys must line up, with their corresponding timingmarks on the engine!!!...so once the belt is installed, and thecrankshaft turned, these marks on the belt are irrelevant - they wontbe lining up with ANYthing now! And this is completely normal and howthey are supposed to be. I'll explain more on this later.) Now on to changing the parts. Photos are below their captions - 1. PARTS: Left to to right: Water pump $75, Idler and belt $62, #1idler $78, power steering and alternator belts $18 (not shown). Everything but #1 idler was bought on-line. The parts all arrived in less than a week. #1 idler, as Toyota calls it, is a dealer only part. I looked all overthe web and at all the local auto parts stores, but no one has itexcept the dealer. (#1 idler it is held onto the engine block by a 10mm female hex bolt.hex socket set is shown in the upper right corner.) When you must buyparts at the dealer, always ask for a discount, say you are with a shopand you might get it. 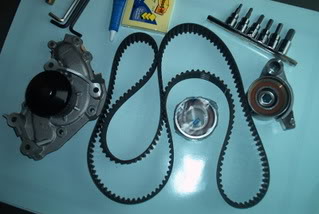 Parts 2. Use great care when handling the new timing belt - you do notwant to get any kind of grease or oil on it. (Rubber gloves are nice tohave when you come to the timing belt installation part because you donot have to waste time washing your hands.) If you get grease on yournew belt, clean it with alcohol and a rag. Jack up the car and place your jack stands. Remove RF wheel. Remove the10 mm bolts and then pull out the plastic wheel well cover. (Doyourself a favor and clean the engine before you begin all this.) Nowremove the alternator and power steering belts, and the upper mountingbrackets/engine mounts. Some people say you need to support the engine before removing thepassenger side mounts, i found there was no need to support the enginesince the remaining engine and trans mounts will not let it fall out. The next step is to Remove the crankshaft pulley bolt (22 mm socket). (By the way - Haynes manual says to remove ALL the spark plugs at thispoint. The reason is to make the crank easier to turn. I'm lazy and didnot do this, i only removed the 3 front spark plugs. In retrospect thisjob would have been easier if i had removed all 6 plugs - it would havemade lining up the pulleys much easier not fighting the enginecompression. But the rear ones are very hard to remove so i justskipped this step.) REMOVE CRANK PULLEY BOLT: I pounded this bolt with my electricimpact wrench but to no avail. Finally i used thebreaker-bar-and-starter bump method, which worked like a charm. To do this, you need the 22 mmsocket, and a breaker bar. (shove a length of pipe over your sockethandle if you have to. If it doesnt work after this i'd buy anotherbrand next time.) Brace the breaker bar against a solid part of thecar. Recconect battery and blip the starter with the key. (DON'T engagethe starter as if you were trying to start the car. Just a blip or two,and now the bolt should be loose.) Don't worry about getting the bolt back on tight right now - we'll get to that later. 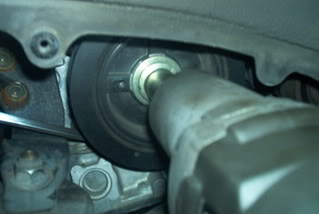 Attempting to remove crankshaft pulley bolt with electric impactgun - failing. Below is shown the starter-bump method. To avoidperforming accidental bodywork while getting the pulley bolt off, bracethe breaker bar against something sturdy, only: The breaker bar isbraced against the lower steering a-arm 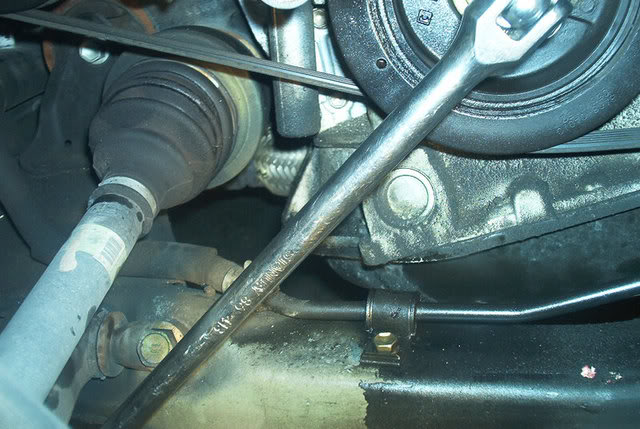 3. REMOVE CRANK PULLEY: The Haynes manual claims "thepulley should come off with hand pressure". This is not so, it isprobably stuck on there like nobody's business and you are probablygoing to need a puller of some kind. I used a steering wheel puller toyank the pulley off, as shown. (The puller was $10 from harborfreight.) It's not a good idea to use a 2- or 3-jawed puller for removing thepulley, although i have successfully done it on other cars in the past.Just remember that it is easy to ruin the pulley using this kind ofpuller. And if you want my advice on how not to wrekc your expensivepulley,i say be very careful and work slowly. First lube the heck outathe pulley hole, what you can see of it, with any spray lubricant. 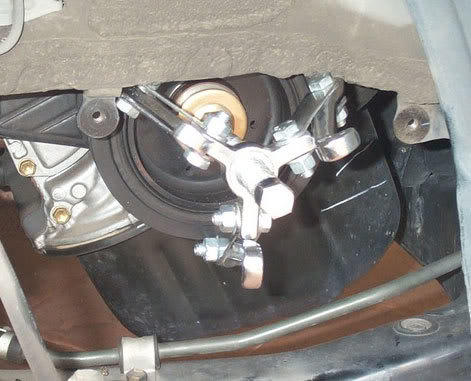 You may use a three- jawed puller to remove the crank pulley, ifthat is all you have. Remember you can mangle the pulley with this toolthough. Use minimal force, turn the bolt a wee bit,then move the pullerto spread out the force. Tighten the puller bolt a little til you can feel it tug on the pulley.Back off the puller bolt, reposition the puller on the pulley, do itagain. (Moving the puller around, spreads the pulling force out; sohopefully the puller jaws won't destroy the pulley.) Just a little bitat a time and ease the pulley off. With the crank pulley off, you can now remove the upper and lower timing belt covers, they are held on by a whole bunch of 10 mm bolts. -The timing belt cover on is two pieces. There is the main timing beltcover over the cam gears, held on by 6X 10 mm bolts. Then there is asmall cover that is behind the crankshaft pulley. It is held on by 4bolts. Before you remove the covers, note how they fit together: (Itdoesn't hurt to make a diagram or take a picture if it will be helpfulto you.) the lower edge of the upper cover fits into the lower cover -and both covers share a couple bolts. At this point, carefully inspect the front crankshaft seal area forevidence of oil leakage. The seal is hidden behind the stamped gear butif it is leaking, you will see it. If any leakage is found, now is thetime to change this seal. 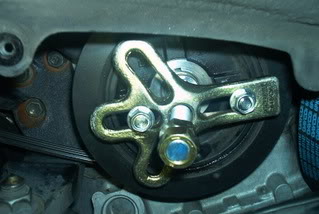 Steering wheel puller used to remove pulley; the threaded holes in the crankshaft pulley were used 4. LINE UP PULLEY DOT MARKS TO ENGINE MARKS (3 MARKS IN ALL): (If your timing belt is broken and/or you cant turn the engine with it, be sure to read step 4a below). Reinstall the crankshaft pulley bolt, finger tight only. Then put thewrench on (22 mm remember) and crank the engine by hand. (Don't worryabout getting the crank pulley bolt out again - a quick yankcounterclockwise ought to work.) (As a general rule, turn the crank bolt clockwise only! Ifyou turn the engine counter clockwise it may cause the timing belt toskip time i.e. make it be off by one or two teeth, and that youdefinitely do NOT want to happen...however you can get away with movingit just a little counterclockwise for adjustments). Line up the dot on the crankshaft GEAR (not the one on the crankshaftsnout! that's for later...Align the dot on the stamped steel gear , seethe tiny arrows in the picture). This mark lines up with the mark on the oil pump. IMPORTANT: Now your marks on the camshaft pulleys MUST line up too (refer to the picture at step 12 below). Ifthey don't line up you might be 180 degrees off on the crank and thisis NOT what you want. And if they dont all line up it means you need torotate the crank exactly ONE more complete turn (as measured by thecrankshaft gear mark + engine mark, same as in the photo) - and makeALL the pulley dots line up now. 4a. Note to those with Shredded/broken timing belt: If yourengine has snapped its timing belt and you do not have the old oneinstalled to turn the engine with - here's what you can do to line upyour marks. You will need 1) a toyota timing belt or other belt thathas all 3 marks on it. 2) a compression tester (Now is the timeto be glad the v6 is non-interference because the pistons should notcollide with the valves when they are turned seperately, because thisis what we have to do now.) To align the pulley and engine marks without a timing belt installed: 1. turn camshafts with the 17 mm wrench til the dots on the camshaft gear (pulley) line up with the notch on the engine. 2. Install compression tester in #1 spark plug hole (the first one in front, towards the passenger side.) 3. turn the crank pulley nut (22 mm remember) and watch the compressiontester. When the needle showing p.s.i. goes up (the crank will getharder to turn.) and stays up - and your crank pulley dot is lined up,this means you are now at TDC and your marks should be lined upproperly to install the belt. VERY IMPORTANT: If you bought a timing belt from somebody otherthan Toyota, your new belt may have come with NO marks on it foraligning! I bought one non-toyota belt that was like this and decidedto keep it (i also have a Solara V6) and just went down and bought aToyota belt that has the marks. But if your belt has no alignmentstripes and you can't just go and buy the toyota one now, you shouldget some white out or water based paint and mark your old belt rightnow that everything is aligned. This way you can use the old belt for aguide and mark the new one yourself by carefully counting the teeth inbetween and/or laying the new belt atop the old one. 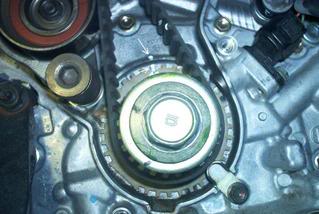 Tiny arrows in photo show the mark on the stamped gear properly aligned with the mark on the engine 5. REMOVE OLD BELT: To remove the timing belt, first unbolt the tensioner. (It is held by two 12mm bolts, one long, one short). Note to People Changing the Water Pump: To change the water pumpon this engine, the camshaft pulleys must come off first. So before youremove the tensioner, remember that you can use the timing belt tensionto loosen the camshaft pulley bolts. Toyotanation member Canyoncarver has this tip for removing the cam pulley bolts: Quote:
Now unbolt and remove the tensioner. The tensioner pin is under a lot of forcen, so loosen the bolts evenly and in increments. If your tensioner looks different than the one in the photo: note that on older V6's, the bolts may be underneath the tensioner, and not the front as per the one in the photo. TIP:If your tensioner has the bolts underneath, some people have said theyjust skipped the step where you put the hex key in the tensioner pinhole - and just tightened the bolts (in increments) when reinstallingthe tensioner. (By the way, this photo is out of sequence. It is NOT possible to have the hex key in while removing the tensioner) 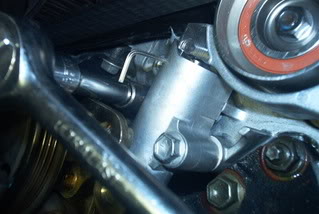 Removing/installing tensioner - hex pulley has been stuck in thruthe corresponding holes to hold the tensioner pin back forinstallation. Its under hella pressure so you will definitely need avise 6. Remove the old belt now. If you are not changing your waterpump you can skip ahead to step 8 or 9 (depending on if you arechanging the idlers too or only the belt). CHANGING WATER PUMP: At this point i chose to change the waterpump, even though it worked fine. To do this, the camshaft pulleys haveto come off. And then #3 timing belt cover. The pulley nuts are 17mm, and they are bolted on very tightly too. (If you change timing belts for a living you might want to consider investing in the tools shown at the bottom of the post.) Remove camshaft pulleys. Now you can remove the 10mm boltsholding the #3 timing belt cover and pull it out of the way. There issome wiring attached to the cover. I simply pivotted the cover out ofthe way without trying to remove the wires. Now that the camshaft pulley gears and #3 TB cover are out of the way,inspect the front camshaft oil seals for evidence of leakage. If yousee any leaking oil, now is the time to change these seals. 7. The water pump is held on by a bunch of 12 mm nuts andbolts. The Haynes manual says you must remove one of the protrudinglong studs, (as shown in the photo below) in order to remove the waterpump. They're wrong again. Just pull out the water pump, wiggle theforward end loose off the stud and then the water pump will come out. The factory gasket is also in the photo...it is a metal and rubbergasket and uses no sealer. I reused my old one. Sure hope it doesn'tleak. After you change your water pump, replace #3 belt cover and all thebolts. Replace the cam pulleys back on the camshafts. A hole and pin onthe back of the pulleys align the cam and pulley, match them up so theymate properly and you cant go wrong here. 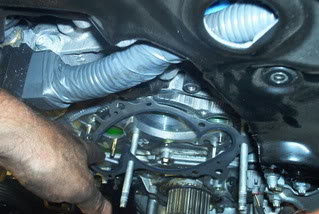 Water pump removed - note the OEM gasket, it is made of stamped steel and rubber 8. CHANGE IDLER PULLEY ASSEMBLYS: upper (14mm socket) and lower (10 mm hex socket). Be sure to use loctite blue on the bolts here. I changed my old idler pulleys even though they still worked - becauseI wanted to be done with all of this for another 90,000 miles. But ifthis is the first time the timing belt has been changed on this engine,and you are broke at the moment, you can probably get by with the oldidler pulleys if you must. But you should at least check the old onesbefore you put everything back together. Spin the idlers by hand andlisten carefully - they must spin freely with no binding and nogrinding or unusual noise whatsoever. If they seem ok you could take achance and re-use them if you have to. But if it is your second timing belt change on this engine, i'd change them for sure. 9. INSTALL NEW BELT: Now put the new belt on, and thenalign the marks on the belt with the dots on the pulleys. Toyota saysput the belt on in this order: 1 -First put it over the crankshaft gear and align the dot on thespline with the mark on the belt (photo below). I held the belt inplace here with a zip tie around the belt -although you could use coathanger wire too. 2 -Then place the belt under the water pump pulley. 3 - Then around the front-most camshaft pulley, and align the mark. 4 - Then place it under the top idler and then over the left camshaft pulley. 5 - Finally snake it over the lower idler pulley. You will need a 17 mm socket to align the camshaft pulley marks andthey will fight you all the way too, because of valve spring pressure.Here's some tips to make it easier - Tip #2, i used vice grips, well padded with a rag, to gently hold the belt onto the front camshaft pulley. Be SURE to not forget to remove the vice grips once you install the tensioner! Tip#3, remember if the marks on the belt aren't clear, there are 59 teeth between the camshaft pulleys. Below shows the timing belt matching mark (the little dot) on the crankshaft snout. Tip #4, : this is NOT the same mark as the crankshaft alignment mark, for putting the engine at TDC! That one is on the stamped gear behind it, they are two seperate marks, as you surely will have noticed by now. Tip #5, like i said, once you have the timing belt marks alignedon the crankshaft and the camshaft pulleys, these marks on the belt areno longer any kind of a reference - they are for belt installation only. Don't forget that. 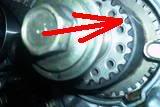 Factory dimple on crankshaft snout has been lined up with the mark on the new timing belt. 10. INSTALL BELT TENSIONER: To reinstall the tensioner,which is the first thing you will do after you install the new belt,use the following procedure. You first must crush the pin in thetensioner back. You will need a vise to do this, it is under ALOT ofpressure. (A C-clamp might conceivably work if that is all you have buti didn't try this, i just used a vise.) If you find the pin moves easily, buy a new tensioner now, because itis worn out. Then shove in a hex key through a small hole in the pin. When you have the marks lined up on the new belt, bolt the tensionerback in place and yank out the hex key to release the tensioner pin. Ilevered the hex key out with vice grips and a screwdriver handle placedunder ditto for leverage.  Timing belt tensioner ready to be bolted back on. It is shownafter the pin has been pushed down with a vise and a hex wrench throughthe holes inserted to hold the pin down 11. Now rotate the crankshaft twice (clockwise only). If you did everything right the marks (ON THE PULLEYS ONLY! ...will align). (To get it right the first time and not have to fix this shit all over again, use the following procedure.) A. Turn the crank over twice to check that the timing marks align, as Toyota says you must do. How? Read on. B. All the marks on the PULLEYS MUST align. Check the three, the crankshaft pulley and the camshaft pulleys. Double check to make sure the little dot marks on them align with the points Toyota made on the engine itself!You can just forget all about the little white stripes on the timingbelt marks; at this point they will no longer align with anything, unless the belt had to be removed and reinstalled again. ) 12. Another photo out of sequence. The marks you used on yourvery first part of the belt install. (I highlighted the marks withwhite out. They are hard to see if you don't do this.) More important, note the little white hash mark on the stamped notch on#3 stamped steel timing belt cover (upper red arrow). At this point thecamshaft pulley dot (lower red arrow) MUST ALIGN PERFECTLY with theother hash mark (top arrow again). If the pulley marks do not align perfectly, you should do it all again until they do. (Forget all about the white stripe on the belt. I guarantee you itdoesnt align with anything right now and what you are seeing is not thesame as whats in the photo.) This is one of the critical steps to dothe job right otherwise i wouldn't repeat things.  Not quite perfectly aligned but you get the idea. At initialinstallation, all three marks must align. IMPORTANT: Once you crank theengine over twice for the double check, the white stripe on the beltwill NOT align - only the pulley mark and engine marks will align atthat point! 13. TEST YOUR WORK: Now the marks are lining up, youshould test your work before you put it back together. Reinstall yourspark plugs now (i always use anti sieze on these threads, its amistake not to). Temporarily reinstall the big washer, crankshaft pulley and bolt. Youneed to do this because the washer is what keeps the belt from flyingoff the crank gear. (There is no need to tighten the crank pulley boltto final torque now because it is coming off again right after you testyour installation.) Reconnect the battery and start the engine. Don't bother reinstallingthe alternator belt right now, there's no need to! You can run theengine off the battery alone for 30 seconds or a minute without illeffect. And this is more than long enough to tell you what you want toknow, which is: did i do everything right?? The engine ought to idle like it did before you started. Once you knowit starts and runs right, you can shut it off and finish puttingeverything else back on. If it runs poorly i.e. worse than it did when you started - realign thetiming marks again and carefully check that the belt is really lined upright after all. You could be one or two teeth off, and this is enoughto make the engine run wrong. 14. Important note on reassembly. Put the "RH enginemounting bracket" parts back on BEFORE you reinstall the timing beltcovers. The mount is really two pieces called the same thing, per thedrawing below. The edge of the timing belt covers go OVER the mount -there is a flange molded onto them for this. So if you put the coverson first you will just have to do it again, because the engine mountgoes back on first. The parts in question are shown below, red 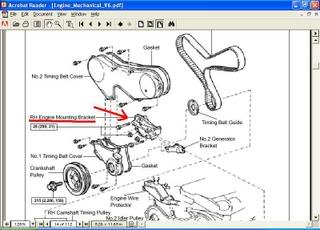 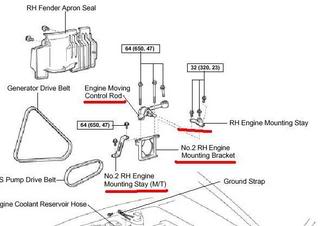 Put the "mounting bracket" parts back on before you try to install the upper and lower t-belt covers 14. Reinstall the power steering and A/C belts (and now is agood time to change them too). Reinstall everything else that had tocome off including the inner fender cover etc. Conclusion I thought i had prepared for this job but i was wrong - i had done manytiming belts before and never had a problem and i was sure i could doit this time too. But these were always on 4 cylinders with only onecamshaft pulley. In short, i was well prepared in tools and parts butshort on some basic knowledge...BTW If i would have locked the camshaftpulleys in place with these tools below, it can make it a little easier. http://www.sjdiscounttools.com/vehic...elt-tools.html 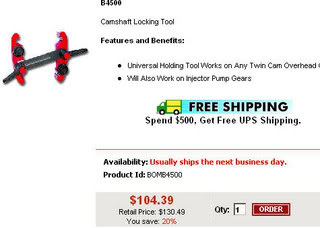  2001 Solara V6 Notes: I did a 2001 Solara V6 timing beltrecently. I dont know if the differences were due to just the differentmodel year of the engines, or the fact that it was a Solara and not aCamry, but here are some minor differences in the procedure i found. -The timing belt tensioner is mounted straight up through the bottomand not offset to the side like the Camry one in the post above. Youwould think you could skip the tensioner pin crush part when you go toreinstall it, and just install the bolts, but this is not the case -its mounting bolts are just too short. - The spark plug coils use two electrical connectors and not just onelike the Camry. To get them off, pry gently outward on the movablelatch part and pull, they should pop off. A spritz of silicone sprayhere might be helpful to get them off. I used, (and always use) alittle bit of electrical contact grease on the connectors, and a smallglob inside the end of the coil pack (spark plug attaching contact)before putting them back on. Submitted by xxx@******.com Revision 0 Article submitted on 30 Mar 2010 Last modified on 31 Mar 2010 Viewed 20809 times |
|
|
||||