so i decided to change my serpentine/accesory belt. i thought i'd share a little info while i was at it. my car is a california 2003 toyota camry LE 2az-fe. instructions apply to most 2az-fe fwd cars, including gen5/5.5 camry, gen 6 camry, and scion tC. i'm not sure about the 2az-fe highlander and rav4.

items needed
  • safety goggles (lol).
  • 2az-fe serpentine belt (i chose goodyear gatorback #4070763 which is around $29.99).
  • racheting socket wrench (the longer, the more leverage, the better).
  • breaker bar (optional).
  • 19mm socket (for your wrench).
  • mechanic/working gloves (optional for extra grip).
  • beverage of your own choice (keep out of engine bay of course).
step 1 - diagram
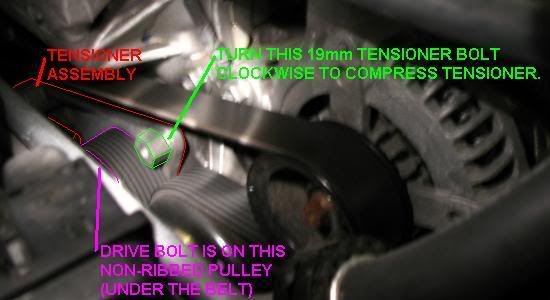
go to page 5 of the camry manual for the 5th gen and print out that page, or you can just save this portion to your computer and print it out:

^this page is necessary since it contains the pattern in which the belt should follow.

step 2 - taking out the old serpentine belt
first off, take a good look at the belt and memorize the belt routing and how all the smooth pulleys are in contact with the smooth side of the belt, and all the ribbed pulleys are in contact with the ribbed side of the belt. there are two ways to take off the belt; you can either loosen the tensioner and simply slip off the belt off the alternator pulley (the most accesible pulley imo), or you can loosen the tensioner and just cut the belt, and take the risk of the belt slapping you in the face pretty hard due cuz you wrongfully thought you gave all the slack it could. use the 19mm socket wrench on the indicated bolt in the diagram and pull it clockwise towards the front of the car. this requires a bit of effort- it may seem like it's stuck, but the hydraulic tensioner is really just that hard to budge *this is where the long wrench is desired*. you'll be able to see the belt give slack when you give it enough leverege- that's when you simply yank off the belt off the alternator pulley or whatever pulley you want. pretty straightforward.
  • update
    Quote:
    Originally Posted by Metallidad I used an 18" breaker bar on the tensioner. I think what you have to remember is that the tensioner is hydraulic, not a spring. It doesn't move very fast since you are working against hydraulic pressure. Slow steady pressure will be enough. At least for me.
    ^good note on the tensioner and what to expect.
    Quote:
    Originally Posted by Camry5genrocks Good info. For the Drive bolt, was easy to put it back?
    with the diagram, the drive bolt is supposed to be removed. i had no trouble or setbacks by not removing the drive bolt, therefore i did not include the removal/re-install of the drive bolt in my instructions. any pulley removal is an extra step that's not needed in my opinion.
    Quote:
    Originally Posted by Camry5genrocks where are the drive belt tensioner and the drive bolt in the picture? is the tensioner you are talking about just below the belt?
    the drive belt tensioner is composed of a pulley, swing arm, and hydrualic shock to provide pressure on the belt. the location of the "drive bolt" is shown below, along with the actual swing arm (tensioner assembly) and the bolt you're supposed to turn (highlighted green) in order to compress the tensioner
step 3 - pre-install check
with the belt off, this is a good time to check that the alternator, water pump, and a/c compressor pulley are able to rotate freely (don't rotate too much- just check). they also shouldn't be loose or be able to wobble.

step 4 - installing the new belt
with the old belt off, you pretty much reverse step 2, starting with putting the belt around all the pulleys (according to diagram) but the alternator pulley or tensioner pulley. make sure the belt is centered on all the pulleys (except the pulley yet to be wrapped around of course), especially the sections where it's rib-to-rib. place the socket wrench back on that 19mm bolt and pull clockwise towards the front of the car once again to release the tension. don't use anything to pry the belt on any pulley, because you may bend one of the pulleys or whatnot. with enough slack, you can put the belt back on.
  • update Quote:
    Originally Posted by touringcamry It really helps to have two people doing this because of the amount of force required to move the tensioner. You also omitted a lot of steps such as removing the front passenger wheel, wheel well liner, engine mount, and engine cover.
    another person can help by compressing the tensioner, while the installer is using two hands to position the belt. on the other hand, i managed to do it by myself in under 10 minutes, and i don't consider myself an extremely strong person. but another person significantly can help no doubt.
    as for removing the front passenger wheel, and wheel well liner, i don't think that's necessary due to the ample amount of space between the wheel well and belt/pulley system. removal of the engine mount and engine cover is definitely not necessary because it is not hindering access to the whole belt/pulley system.[indent]
step 5 - final check
check that the belt is on correctly. store all tools. consume beverage of choice. recycle.

0 total comments, spanning 0 pages.
Showing 0 to 0
Sign in to make a comment.


Submitted by xxx@******.com

Revision 0
Article submitted on 31 Mar 2010
Last modified on 31 Mar 2010
Viewed 25277 times

Please enable / Bitte aktiviere JavaScript!
Veuillez activer / Por favor activa el Javascript![ ? ]