| While the debate over the merits of blow off valves (BOVs)is sure to continue, what remains is (as was so eloquently said by someone),those that have them, love them; those that don't, simply don't understand.Check out the FAQ section for a detailed explanation of the theory behindblow offs. They essentially replace the existing recirc valves and in theprocess add a very cool 'pssshhhh' sound when shifting. BOVsare made by several of the big manufacturers such as HKS, Greddy and Blitz.This install covers the installation of the APEXi BOVs (1.). I chosethem due to both the low price, and the distinct look. They may not beas loud, or as high pitched as some of the others, but they work well forme. Tools: Socket wrench and 8, 10 & 12mm sockets
10 mm box wrench
5mm hex wrench
Pliers
Long screwdriver (optional)
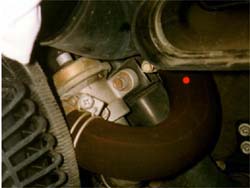
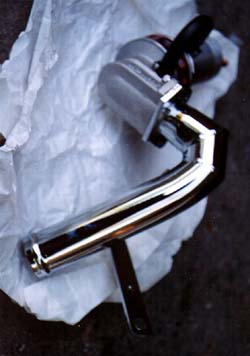
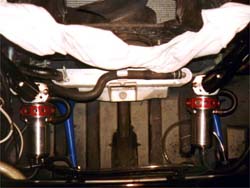
WD-40 (optional) Installation: 1. Remove the factory re circulation valves. Use steps 1-7 of the TwinPOPInstallation TECH to remove them, it covers the passenger side recircvalve. The procedure is the same for both sides. This does not cover the(unlikely) possibility of having the stock air box in place. If this isthe case, reference K&N TECH for detailson removing the stock air box. 2. Plug the holes in the intake piping with the rubber stoppers includedin the kit. The hole is where the other end of the hose coming out of thestock recirc valve is going to (red dot in 2.). 3. Start assembling the BOVs. First attach the small hose (green dotsin 3.) between the two fittings on the BOV. Remember to put thehose clamps on the tube before pushing them on the fittings. Put a littleWD40 on the fitting, it makes it MUCH easier to put the rubber hose on.Bolt the chrome tube to the BOV (4.). Remember to put in the gasketssupplied in the kit. Note: while the diagram included in the kit showsthe bolts going in one direction, they must go in the other (the nuts simplywon't fit on the BOV side). Now put a copper connector in the end of oneof the long hoses (don't forget the hose clamp) and the other end of theconnector to the small vacuum line pulled out of the top of the recircvalve (removed in the second part of step 7. in the TwinPOPInstallation TECH) to extend the lines. 4. Push the end of the chrome tube into the lower tube that looks likeit's coming from the engine and tighten the clamp. Connect the mountingbar on the chrome tube to the recirc valve mounting hole closest to thefront of the car. On the passenger side, take care not to gouge the A/Clines. The lines rubbed against the brace on my car, so I *carefully* bentthe brace where they didn't rub anymore. The A/C tubing is soft aluminum,so the brace would probably gouge a hole in the line. Not good! Other cars/BOVsmight fit differently. Finally, push the end of the long small vacuum lineonto the front end of the BOV (blue dot in 3.). Don't forget thehose clamp! Repeat on the other side. 5. The installed valves should now look like this (5.). Turnthe red dials to adjust the sound (yellow dot in 3.). Supposedly,the smaller hole is louder. 6. Adjust the pressure release spring tension by using a hex key totwist in the screw (5 mm hex wrench, red dot in 3.) on the end ofthe BOV, there is a 12 mm lock nut to loosen first. I was able to hit fullboost without any adjustment, but according to APEXi, the screw shouldonly protrude 2-4mm. Experiment with it, just keep in mind the furtherthe screw goes in, the higher the boost required before the BOV releasespressure. Too little spring tension will cause erratic boost response. WARNING: A tight valve results in better boost response between shifts,but may cause some excess boost pressure to flow back to the turbos. Tighteningthe valve too much could potentially damage the turbos through compressorsurge (see Z32FAQ on merits of BOVs). 7. Reinstall the filter & panel and it's done! (6.).
|