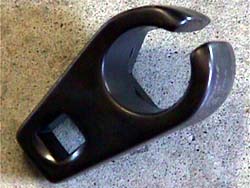
| This is illegal in certain instances, it should only be done if the car will be used soley in 'off-road' conditions. I don't see what the hassle is if I can still meet or exceed local/state emissions testing. Overall, I think it's legal after60k miles, but you must retain the main cats for emissions purposes inmost states. States where cold start emissions tests are required, the pre-cats must be retained as well. The pre-cats exist to pass the secold start emissions tests. They burn off the fuel while the main catalytic convertors are still warming up. This mod is worth about 9hp to a Stage III Z. Removal allows the turbos to spool up quicker due to an increased volume of airspace before the first catalytic 'brick'.Unless you are planning to get a full blown 3"exhaust from head to tail, simply gutting the pre-cats will suffice. This isn't the best method, that would be to actually remove both pre-cats from their turbos & 'gut' them away from the car. To remove both pre-cats requires the transmission to be dropped to get to the bolts on the driver's precat or have some specially bent wrenches. This method is the safestto use w/o dropping the transmission. The ceramic 'brick' that is the catalytic tends to shatter & turn to turbo seal ruining ceramic dust. : ( This will probably lead to pre-mature turbo failure if they were gutted on the car & the dust was allowed to rise. This technique allows the turbos to not get covered in the harmful dust (or you for that matter). Timing would be best if you are getting a new clutch installed, or the tranny has to be dropped from some other reason to do it the 'proper' way. There are a few special tools required for this. - Snap-On part number YA8875 'Compact Oxygen Sensor Wrench'. I used to use a plain 22mm crow's foot socket, but it just doesn't cut it & lead to more frustration than anything. I was told there is an alternative to the S-O piece. I looked at 2 Pep-Boys around me with no luck, maybe they are available in certain stores. The part is made by Performance Tool, and the number is W84008. It is the same as the S-O, and only $9.99.
- Specialized 'gutting' tool of choice
- An 18" piece of 1/4"ish OD metal tubing with a 'V' cut in one end.
- O2 sensor spacer P.N.: 20607-p6500 also available from CourtesyNissan
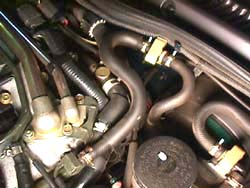
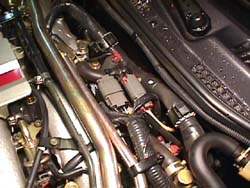
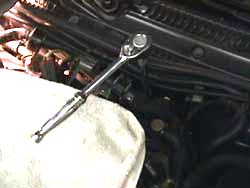
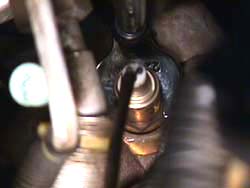
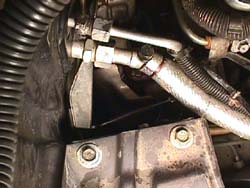
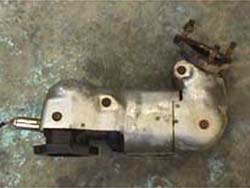
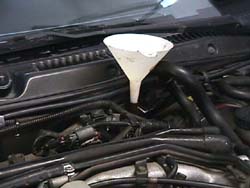
1. Unclip the brake booster vacuum hose (1.) from the firewall& 'flip' it to the top side of the brake master cylinder. Unclip the main wiring harness (2.) on the driver side firewall. There's one clip point on the firewall & another on the engine. Move it as far as possible toward the center of the engine bay. This affords the best angle to get to the driver O2 sensor. Once you find it (not nearly as easy as the passenger side's 5.), trace the wire up to it's plug. It has a clip halfway up on the back of the block. Unclip the clip by pushing on the backside with a flat blade screwdriver. 2. A car lift would help tremendously here, but most of us don't have such luxuries... So, raise the car to about 18" off the ground on jack stands using all appropriate safety measures. You will be spending a considerable amount of time under the car, PLEASE make sure it is stable on it's jack stands... 6. Drop the main exhaust pipes w/ main cats. Disconnect the AIV hoses from the exhausts if it's a '90-'92. (2 x 8 mm/phillips screwed hose clamps).Remove the pipes by unbolting the Presilencer/H or X pipe (hardware depends on exhaust, 4 x 17 mm nuts/bolts for stock), unbolting the pipes from the pre-cats (6 x 13/14 mm depending upon year) & finally removing the nuts on the hanger brackets at the end of the transmission (2 x 12 mm nuts).With some one else pulling on the muffler section to clear the studs, thepipes should come out without having to drop the entire exhaust assembly. 7. Using an 18" extension, a u-joint swivel, & the Snap-On tool(3.), remove the driver O2 sensor. Put the tool on the sensor with the 'arm' pointing forwards. Then snake the extention from above &connect to the tool (you'll need a swivel in between), then crank it off(4.). Remove the O2 sensor. 8. Remove plastic lip over battery, disconnect the negative battery terminal first, then remove the battery. 9. Find the O2 sensor on top of the passenger pre-cat (5.), follow the wires to the single clip above the turbo. Unclip the clip then follow the wire all the way up to the wiring harness on the side of the plenum& unplug the connector. 10. Remove the bottom two 13 mm nuts on the passenger pre-cat with a wrench. Remove the top two 13 mm bolts on the passenger pre-cat. A deep13 mm socket will help greatly instead of having to use a wrench. Remove the one 10 mm bolt holding the turbo's heat shielding to the pre-cat on the 'outside' of the turbo. This bolt is very hard to see, but is easily removed with a wrench (Hard to see horizontal wrench above battery tray6.). Remove the passenger side pre-cat (7.). Use a penetrating lubricant to speed things up, it's also helpful for the O2 sensors, the precat hardware & all exhaust fittings. I recommend 'Blaster' brand. 11. Oil up a 12" x 12" paper shop towel with motor oil. Cram it into the pre-cat through the driver's O2 sensor opening. You must get all of it in there with the exception of enough sticking out to retrieve it after gutting is complete. One person pushes from above using a 18+" 1/4" OD tube to push the towel in & the other below guides more towel in the way of the tube to get pushed in. 12. Using the same 18+" piece of tubing & a funnel (8.),flow motor oil down the tube (5-? w)& into the pre-cat through theO2 sensor hole. You must completely saturate the brick in order to not have any dust. I use about a half quart. The ceramic dust will destroy the turbo cartridge over time if it is allowed to rise. This is what the towel will help prevent as well. Better to be too safe than sorry. 13. Use your specialized catalytic removal tool to 'gut' the driver pre-cat from below (9.). Be gentle with this side, there is a sharp bend that should keep you from poking the turbine with your 'gutter'. Again,better to be too safe than sorry. Make sure to get the wire mesh stuffout too. I will also use an oil squirt can to saturate anything that doesn't get soaked in the initial drowning to keep the dust down. MAKE CERTAIN you wear safety glasses while gutting, or doing anything under your Z.Read this. TIP: The ceramic brick is just sitting in there, insulated by 3 bands of looped wire mesh. Try to break the brick into large chunks by 'cutting' across it to divide two large chunks. If the gap made is wide enough the chunks will basically fall out, greatly decreasing gutting time. Use a pair of needle nose pliers (or vice grips) to grab the mesh & jerk it out. It's spot welded in place along the edges to slow you down. 14. Clean out the remaining ceramic sludge with brake cleaner. Let it dry out. Remove the towel, then reinstall the O2 sensor & make all clip& electrical connections. 15. Place the passenger side pre-cat in a vice (10.), remove the O2 sensor & spacer (26 mm?, use a BIG crescent wrench). Stick the extra sensor spacer (11.) into the opening (P.N.: 20607-p6500) to keep from ruining the threads on the pre-cat during the initial gutting. 16. Pour motor oil in both ends of the passenger pre-cat, this keeps dust from being a problem. Use the specialized catalytic removal tool to 'gut' the pre-cat through the O2 sensor opening. Make sure to get the wire mesh stuff out of it as well. TIP: Use previous technique to get the brick out. The 'V' groove cutin the end of the 18" tube will help to remove the mesh bands. The mesh will be hanging across the inside of the precat. Use the 'V' to grab the mesh & then twist/push down on it to tear it free. 17. Clean out the remaining ceramic sludge with brake cleaner. Remove the extra spacer, reinstall the O2 sensor. Let it dry out & reinstall to the passenger turbo. Make all clip & electrical connections for the sensor. 18. Check all under hood connections that might have been unplugged.Reinstall the battery & plastic trim piece. 19. Making sure the Z is in neutral or park, start the car for a secondto make sure everything gets blown out/operates properly. 20. Reinstall the main pipes. 19. Get the Z safely back to Earth, minus a few pounds of unneeded catalyticweight.
|