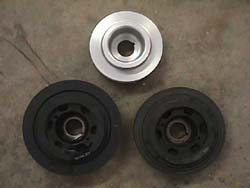
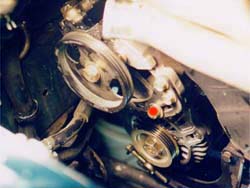
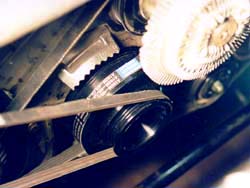
| The underdrive pulley is a product that is verynew to the Z scene, it's been available for domestics for a long time.Basic concept for hp gain it two-fold: 1st, the pulley has a smaller diameter(1.), which is a mechanical advantage. It changes the ratios between the crank and the accessories, actually driving them slower, reducing 'parasitic drag' on the crank from driving the accessories. 2nd, it is made of aluminum,instead of iron. This weight reduction improves hp, because it is less weight the crank has to rotate. The stock pulley weighs about 13 lbs forthe TT, a little less for the NA (in 1. the underdrive pulley is at the top, a TT pulley on the left and a NA pulley on the right), The underdrive pulley weighs in around 3.5-4 lbs. Each lb. of mass taken off the crank/eccentric shaft is worth approximately 2.7 HP and the figure increases with forced induction and as RPM's increase. The Downsides: 1st, the speed reduction on the accessories might not meet the driving demands.Alamo Autosports tested voltage output of the electrical system & foundonly a .1v drop in current under full load. After a year of people drivingwith pullies in warmer climates, there's been substantial evidence theA/C is up to par. One thing to understand is the minimums are met at idle,so if the engine is anywhere above 850 rpm, then there shouldn't be anyissues with the lowered accessory pulley speed. High powered mobile audiocould possibly effected depending on power draw. 2nd, the weight reductioncauses loss of inertial energy, the same way the aluminum flywheel does,there isn't enough inertia to maintain a constant rotational speed, whichmakes it a *little* harder to drive, with a few minutes of driving thedifference will be negligible. 3rd, the pulley also is without the 'harmonicbalancer/tortional damper' ... if the crank isn't within certain tolerances(tight factory spec.) it could cause a 'wobble' in the crank, leading topremature bearing wear. Z cranks are manufactured to tighter specs thanmost American made cranks, running without the balancer shouldn't posea problem. NOTE: I am still skeptical of longevity hazards here, but likemost performance mods, you sacrifice some reliability/longevity for higherperformance levels... Special thanks to Vince @ Courtesy Nissan for belt PNs & Kyle@ SGP for belt PNs & review of the procedure. Timing: Anytime the radiator is out of the car is acceptable...like 60k maintenance. This one is installed on my '95TT. Special Tools: - 27mm socket
- Air wrench (not required, but very beneficial)
- 3 claw pulley puller
Other Parts Required:3 New accessory belts. The power steering belt went to a 3 rib in '94+ TTs - Nissan PN# '90-'93 TT: A172M-59SSAVW, '94+ TT & all NAs 11950-32F10 Power Steering
- Nissan PN# A195M-97E0MVW Alternator
- Nissan PN# A192M-42LSAVW A/C
OR...;- Gates PN# '90-'93 TT: 040350 '94+ TT & all NAs: 030350 Power Steering
- Gates PN# 040390 Alternator
- Gates PN# 040365 A/C
OR generics...- '90-'39 TT: 4 rib 35", '94+ TT & all NAs: 3 rib 35" Power Steering
- 4 rib 39" Alternator
- 4 rib 36.5" A/C
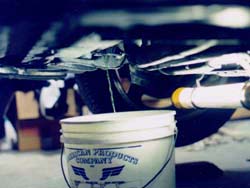
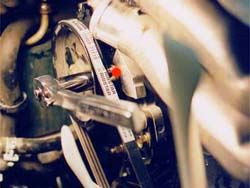
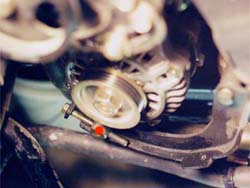
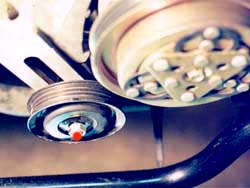
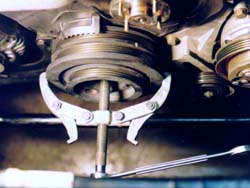
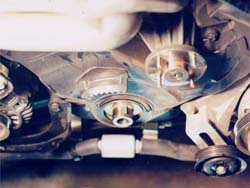
Installation:1. Get the front of the car in the air, about 16-18". Make sure alljack stands are properly placed, or better yet, use ramps on the frontwheels, & all safety measures are taken. Make certain the rear wheelsare e-braked & chocked, the crank will be wrenched during this, sothe car moving off the stands is definitely possible if these steps aren'ttaken. 2. Remove bottom engine shielding (6 x 10mm). Drain the radiator (2.)by removing the radiator lid and the 'vent plug' on the opposite side ofthe radiator (1 x phillips). The plastic petcock on the lower back sideof the radiator is poorly designed and I have only met up with 1 that workedcorrectly. Just unscrew it until fluid starts dribbling out into the bucket.Let it go until done, then move the bucket under the lower radiator hosewhere it goes into the radiator. Remove the hose from the radiator (1 x10mm), hopefully the rest of the radiator fluid will make it's way intothe bucket & not onto the floor. 3. Pull hoses off coolant tubes on the front of the engine, then removebolts holding radiator retaining clamps (3. dot shows bolt head)in (2 x 10mm). Remove the lower radiator hose from the bottom of the car,minding where left-over fluid will end up. Remove the bottom part of fanshroud (3 clips). Remove the overflow hose from the radiator (right belowand behind the radiator cap) neck and clips on the side of the radiator.Tuck the hose off to the side and don't let it fall down. It will drainthe remote coolant resevoir. Remove the radiator. 4. Remove radiator fan (4 x 10mm) & fan clutch (4 x 10mm). 5. Loosen belt tensioner (1 x 12mm) on the power steering pump, thenloosen the bolt slightly on the power steering pump mount (4. dotshows where the bolt head is) (1 x 14mm). This bolt is accessed throughone of the holes in the pulley. Shift the car in neutral and put the torquewrench on the crank bolt to rotate the pulley where the bolt is accessable.Make sure to put the car back in gear afterwards. Loosen the tensionerlocking bolt (5. dot shows where bolt is) (1 x 12mm). 6. Loosen belt tensioner on alternator (1 x 12mm), then loosen boltslightly on the alternator mount (1 x 17mm) & tensioner locking nut(6. dot shows the back side of the tensioner lock) (1 x 12mm). 7. Loosen belt tensioner on the A/C compressor idler pulley (1 x 12mm),then loosen bolt on idler pulley (1 x 14mm) (7. dot shows lockingnut on the idler). 8. Remove all three belts. 9. Remove crank bolt holding the pulley (1 x 27mm). An air wrench willmake this simple, otherwise put the car in fifth with the parking brakeon & do it the old fashion way. Leave the bolt in, but loosened, ithas a detent in the head of it for the pulley puller to ride in, keepingyor threas from being harmed. Then use a pulley puller to remove the crankpulley (8. & 9.). Be careful not to loose the woodruffkey in between the pulley and the crank. It is there to maintain alignmentbetween them. 10. Install the new pulley. Make sure to get the pulley lined up onthe woodruff key. Retorque crank bolt to 165lb. 11. Install new size belts, then assemble in reverse order. To get thepower steering belt al the way on, shift the car in neutral an put thetorque wrench on the crank bolt again to 'rotate' the belt onto the pulley.Make sure belt deflection is no more than 1/2" on the power steering belt& no more than 1/4" on the others at any midpoint after tightening,this is for new belts only (10.). More than likely, they will requiretightening after a few days of use. The belts will squeal on start-up tolet you know when. 12. Replace coolant by filling the radiator, then starting the car &letting it idle while continuing to fill as required. Watch the coolanttemp needle while driving the first couple minutes to make sure the carisn't running low on coolant.Don't forget to check the coolant level inthe overflow tank. REV: 1-9-2000
| 1.
2.
3.
4.
5.
6.
7.
8.
9.
10. |