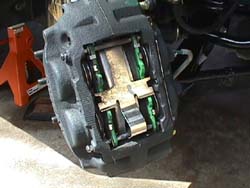
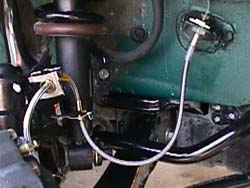
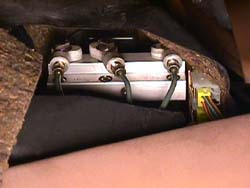
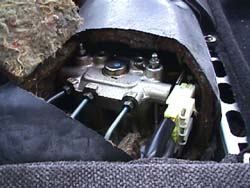
| Another performance improvement for the Z braking system is a set of Stainless Steel braided brake lines to reduce pedal'mushiness' under street/racing conditions. Coupled with a high quality brake fluid like Motoul 600 to re-fill the lines with, the pedal staysfirm under even the most extreme conditions. This installation of Goodridge SS lines P.N. 22073 2/89-96 300ZX wasdone on my '95 TT Timing:
Any time the wheels are off. Special Tools:
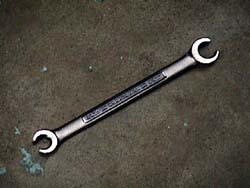
1. 4+" C-clamp
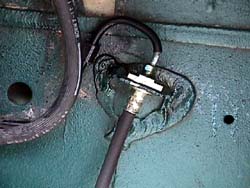
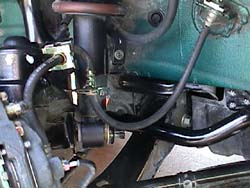
2. 10mm Flare nut wrench
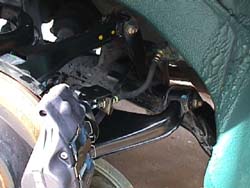
3. Long brake bleeding hose Installation: 1. Break loose all lug nuts for wheels involved. Get the car in theair, enough to get the wheels off the ground. Make sure all jack standsare properly placed, & all safety measures are taken. Remove lug nuts& wheels for access to calipers (1.). 2. Remove the lid from the brake master cylinder. Put an oil pan underthe caliper. Unbolt the lower hose fitting with the flare nut wrench (2.),remove the retaining clip with needle nose pliers & pull the rubberline away. 3. Use the C-clamp to SLOWLY squeeze the fluid out of the caliperby clamping onto the brake pad, along with the draining fluid from thelines. Pump the brakes to help move the fluid out of the lines. After thefluid has 'drained' unbolt the upper hose fitting (3.). Use needlenose pliers to remove the retaining clips holding the lines in place. Thenremove the line (4.). 4. The front lines have two extra clips on them, but the hose can movefreely. Roughly compare the spacing of the clips on the new line to thespacing on the rubber lines & install the same way. Install the SShose & replace the retaining clips. Turn the steering wheel full lockside to side to ensure the line doesn't bind anywhere on the suspension(5.). Also keep in mind it has to work up & down with the actionof the suspension too. Torque fittings to 12ft-lbs. 5. The rear lines are a straight replacement of the rubber lines. Simplyremove & replace like the front lines (6. & 7.). Torquefittings to 12ft-lbs. 6. Bleeding the brakes is generally a two person job, I still don'tbelieve in the '1 man' kits. Fill the brake master cylinder with brakefluid of choice DOT3 or higher. Don't use DOT5. I personally recommendMotoul 600. It takes about 3 bottles of Motoul to completely flush &bleed the brake system. Disconnect the negative battery terminal. 7. One person pumps the brake pedal, then holds. The other opens &closes the nipple using a 10mm wrench with the bleeding hose attached tothe nipple (8.). Repeat this 3-4 times each corner until the fluidruns clean & has NO bubbles in it. Then go to the next caliper in order.Left rear, right front, left front, right rear, ABS actuator front, ABSactuator rear. Repeat this order until all four corners are clean &air free. Even the tiniest bubble will harm performance, as it will expandwhen heated. The ABS actuator is under the plastic hump behind the passengerseat. The ABS actuator on 94+ (9.) doesn't have bleed nipples, soI'm not sure how that works out. I bled the brakes on my '95 for a whileuntil the 'gurgling' noise went away from the ABS actuator while bleedingit. '90-'93 have the nipples (10.). 8. Torque lug nuts to 78ft-lbs using a criss-cross (skip 1) pattern.Do this with a proper torque wrench. Improper torque values are probablythe leading cause of rotor warpage. NEVER let the tire shops, etc.put the wheels back on with an air wrench. Make them do it by hand. I personallywon't even let them remove the lugs with the air wrench, everything is done by hand.
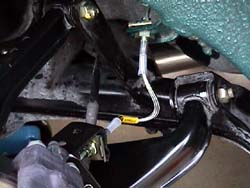
|