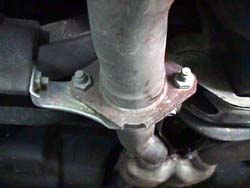
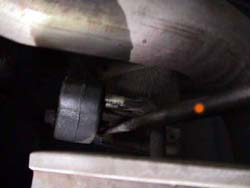
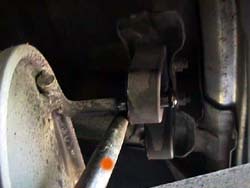
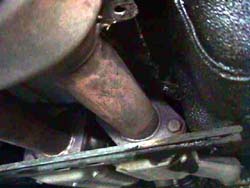
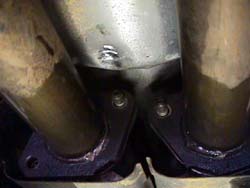
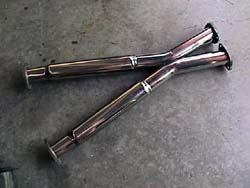
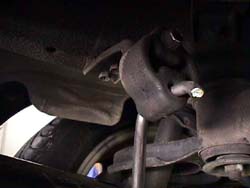
| The more air moved through an engine, the morepower that can be produced. Generally one of the first modifications toany car is to replace the usually restrictive OEM exhaust with an aftermarket 'cat-back' performance exhaust. Cat-back refers to replacing themufflers and the pre-silencer, so replacing the exhaust from the catalyticconvertors back. This mod can release up to 25rwhp depending on the exhaustand other mods. This installation is of a BandB 2.5" system on a '93TT. 3" system instructions are also included, but not illustrated. Special Tools: 1/2" drive Air impact wrench
1/2" drive 6" extension
1/2" drive U-joint
1/2" drive 17 mm deep socket
1/2" drive 17 mm shallow socket
Anti-seize compound Parts needed: 4 metal exhaust gaskets (2.5" systems) PN 206092-1E810 (not verifiedyet w/ Courtesy)
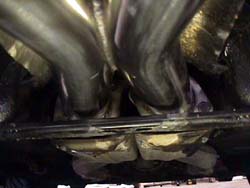
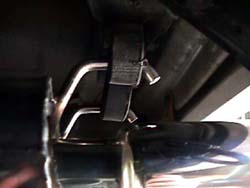
Permatex Copper Seal (3" systems) Pre Installation Note: If installing a 3" version, read step 8 VERY carefully to avoid majorheadaches halfway through the installation. Installation: 1. Disconnect the negative terminal of the battery. Jack up the rear of the car. Put it either up on ramps or on jackstands. I prefer ramps, there's more elbow room over jack stands. 2. Get under the car and spray everything exhaust related from thecatalytic convertors back with a penetrating lubricant. I recommend 'Blaster'brand. This includes nuts, bolts, rubber hangers, the bolts holding therubber hangers, everything. 3. Remove the nuts on the muffler hanger (4 x 17 mm) using the impactwrench (1.). Swing the muffler back off the pre-silencer and bracketstuds. 4. Use a pry bar to pop the muffler off of it's rubber hangers. Do thefront one first and let the muffler hang down a bit to help pop the hangersout of the rear mounts (Orange Dots in 2. and 3. are on thepry bar for placement). 5. Remove the muffler from under the car and perform the same procedureon the other side. 6. Remove the safety bracket from under the front of the pre-silencersection of the exhaust (4 x 12 mm). Using the impact wrench, the extension,the U-joint and sockets in whatever combination works best, remove thenuts and bolts from the catalytic convertors holding the pre-silencerin place (4.). The U-joint will help the most with the nuts on thetop part (5.). Slip the rear hangers off the pre-silencer, thenremove it from the car. For BandB systems with the dual 4.5" oval tips,remove the rear tow hooks (4 x 14 mm), the tips won't fit in there withthe hooks in the way. For 3" systems skip to step 8. 7. Hang the new metal gaskets on the studs of the catalytic convertors.Put anti-seize compound on the studs and bolts. Figure out which endis up for the X/H pipe, it's difficult to flip it over once it's underthe car (6.). Stab the X/H pipe onto the catalytic convertor studs.The gaskets will be hanging down, that's OK for now. Run the rear hangerstuds through the rear flange on the X/H pipe to hang then entire piecein place. Use a finger to swing the metal gaskets up into place. Skip to step 11. 8. With the larger O.D. on the 3", things get really tight around thestuds. 'Cap' nuts are definitely needed. These are really thin walled nuts.The 17 mm OEMs have a lot of metal involved. The cap nuts will be 14mm,but still have the same I.D. A set of bolts with the same threads willbe needed as well with 14mm heads. The 17 mms WILL NOT FIT! Before reallygetting into this, I suggest crawling under the rear of the car and poppingoff one of the nuts holding the muffler to the pre-silencer for a threadreference. Then got to Pep-Boys or the local import speed shop and getthe right hardware. The kit would consist of: 6 nuts and 6 bolts total. 2 nutsand 2 bolts for the X/H pipe to catalytic convertor. 4 nuts and 4 boltsfor the muffler to X/H-pipe. The most trick method would be having hexheaded bolts, this solves a lot of the headache of the 3" system. I didthis with mine when mating up 3" test pipes to the 3" X pipe on my BandB,SO much easier. 9.Put a small bead of Copper Seal on the catalytic convertor flange.Put anti-seize compound on the studs and bolts. Figure out which endis up for the X/H pipe, it's difficult to flip it over once it's underthe car (6.). Stab the X/H pipe onto the catalytic convertor studs.Start the lower bolts first to hold the X/H pipe up, then start the nuts.Don't tighten them just yet. Once again, the 3" causes some clearance problems.The hangers that provide the connection between the muffler section andteh X/H-pipe won't fit. Remove the hangers (2 x 12mm) to get them out ofthe way. 10. Put a bead of Copper Seal on the loose flanges on the X/H-pipe.Do step 13, except use the extra set of cap nuts and bolts from step 8. Once everything is in place then tighten down the nutsand bolts to the catalytic convertors. The best speciallized method isto put a 14 mm 1/4" drive with built in U-joint (Snap-On) on the nut andslip a 12" 1/4" drive extension over the top of the X pipe to get to thetop nuts. I had to beat up the aluminum plate above the pipes a littlebit to make this work. Other variations on this theme will probably workto some degree. The box end of a wrench wouldn't work, because the wallof the box end is too thick, otherwise it would work the same as the 2.5"version. Unfortunately, a torque wrench doesn't do much good here, sinceeverything's too tight to get it into motion. I just lean on the wrenchhard to make sure everything is tight. Reinstall the safety bracket (4x 12 mm) (7.). Skip to step 14. 11. Using 3/8" drive U-joint, shallow socket and extension, startthe bolts and nuts back in. (4 x 17 mm). The socket depth will run outeventually. The X pipe keeps me from using a deep socket with the U-joint,an H pipe will probably allow it. The angle of the top nuts is just enoughto allow a 12th of a turn, then smallest increment on a 12 point box endwrench. Keep tightening everything with a wrench. Unfortunately, a torquewrench doesn't do much good here, since everything's too tight to get itinto motion. I just lean on the wrench hard to make sure everything istight. Reinstall the safety bracket (4 x 12 mm) (7.). 12. Install the metal gaskets on the studs. Put anti-seize compoundon the hanger studs coming through the rear of the X/H pipe. 13. Figure out which end is up on one of the mufflers. Stab the tworear hangers first (8.). Stab the front hanger next (9.).Swing the exhaust and stab it on the X/H-pipe studs. Do the same for theother side. Run the nuts down close to tight (2 x 17 mm). 14. Get the Z back down on the ground off the stands or ramps. 15. Stand 20' behind the car crouched down and look at the mufflercan/tip's angle ('before' 10.).There's a little free play in thestuds up front that will allow some tweaking on the angle. Twist thepipeshowever necessary to make them level. I am able to get under the carwithit on the ground well enough to tighten the nuts (and bolts on 3") witha socket wrench. If you're a little wider that I am, or the car islowered,a U-joint and a long extension should get you through. I had to tweaktheright exhaust tip on Allen's car to make things look square. On 3"systems, check to make sure the top of the pipe is not rubbing thebottom of the HICAS linkage. I stick a wrench inbetween the pipe &the linkage while tightening the rest to make certain the space ismaintained. 16. Reconnect the negative terminal of the battery. The ECU hasprobably had enough time to reset during the installation. If there'sno noticeable power gain, try leaving it disconnected overnight. TheECU goes through a 'learning' process after reset to adapt to changesmade to the car. Originally published 7-25-99 |