|
This is an advanced page, I'm not going to go into super detail on the simpler items. If you can't figure it out just by doing it, this whole job is probably over your head. A lift makes this easier, although it'snot a requirement. Observe all proper safety procedures, jack stands etc. This is obviously involved & requires the highest precaution levels,as you WILL spend MUCH time under the car wrenching. I did mine with the car lifted about 18" and this allowed me to use my arms without that uncomfortable 'too close' feeling, I also use a floor creeper to make life easier.This engine removal is for manual shift models. This procedure was done on Shahram's'93 TT, which doesn't have the AIV assemblies. There is some extra hoses around the backside of the engine to deal with. Sorry I can't shed anymore light on it then that, but it's been since '97 when I did the engine in my '90TT (with AIVs). Just keep track of the extra hoses as you go.
Timing:
Turbo replacementis the primary reason to pull the engine. Might be because of a spun bearing,a thrown rod or some other required internals repair. Even better is a full engine build up for monster hp.
Special Tools:
1 ton engine hoist or stonger
Chains to go with hoist
Load leveler with hoist is an extra
36" 1/2" drivesocket extension for the transmission
Fender service cover (4.) is one of the BEST tools I own.
1. Relieve Fuel Pressure:
Remove relay, start the car until fuel is spent (Details step 1-4)
2. Drain Fluids & Remove Battery
Drain oil & remove filter (Details step 2-6)
Drain coolant (Details step 2)
Unplug negative terminal, make sure it can't come back in contact withthe post
Remove battery (remove the cowling 4 plastic clips & battery strap2 x 10mm)
Set battery on a wood block so it doesn't discharge
Prop hood at highest setting (there's more than one)
3. Remove Radiator, Fan & Drive Belts
Remove radiator, fan & drive belts (Details step 3-8)
4. Remove Alternator from the engine
Loosen mounting bracket on engine block (1 x 12mm)
Remove upper pivot bolt (1 x 17mm)
Note:The nut on the backside will fall out, it's got a special tab welded on it & isn't secure to anything.
Lower alternator
5. Remove AC compressor from engine
Remove lower mounting bolts (2 x 14mm)
Remove upper mounting bolts (2 x 14mm)
Note:The top back bolt is impossible to get to from the rear. I used a 14mm crowsfoot on a 9" extension to get to it from the front. Go over the top ofthe AC compressor to get to the bolt backwards. Remember tight & loose are reversed from this angle! I'm not sure how easy it is to do this with the engine bolted in the car. I was able to get to it 'easily' once the engine was slightly lifted & tilting backwards. This bolt is absolutely not required on re-assembly. Nissan dealers do not replace it from what I've seen.
Disconnect the compressor clutch plug
Wire Compressor to side of engine bay, forward & to the right, being careful not to twist the hoses
6. Remove power steering pump from engine
Unbolt pump (1 x 14mm though the holes on the pulley)
Remove the front of the adjustment bracket (2 x 12mm)
Wire pump to left side of engine bay
7. Remove balance tube & intake hoses
Remove balance tube (Details step 1-4)
Remove front intake hoses (8 hose clamps), or 16 if they are coupled hardpipes.
Put rags in all intake tract openings to keep debris out of thehard pipes
Loosen the clamps on the lower low pressure intake plastic pipes
8. Removewiring, etc. on top of engine
Disconnect 6 injectors plugs
Disconnect 6 spark coil plugs
Disconnect fuel temp sensor by #1 cylinder injector
Disconnect all plugs along the driver side:
TPS (2)
boost cut if still running stock boost
Disconnect all plugs along the back side:
idle air control (3, 1 yellow, 2 blue generally)
O2
EGR temp (all Cali cars and '96ers)
grounding groups (2)
VTC
detonation sensor
Note:The VTC and detonation sensor have identical plugs, it's easy to get them confused when reconnecting things later. To identify them now: The det. sensor plug should be vertical dead center in the rear of the engine, the VTC connector should be on the driver side paired with the O2 sensor. To identify them later: The VTC wire on the engine side has a white shielding jacket on it, the det. sensor doesn't. The VTC wire on the harness side will be paired with the driver side O2 sensor, the 4 & 6 coil plugs, a group of grounds and 2 of the idle air control plugs. The det. sensor will be paired with all of the injector plugs, the fuel temp plug, 1,2,3 coil plugs, and the last idle air control plug.
Disconnect all plugs along the passenger side:
O2
VTC
boost cut if still running stock boost
Remove the oil dipstick
Disconnect hoses along the driver side:
carbon canister hose from under the throttle body
recirc/BOV hose from front vacuum tree
clutch vacuum hose from front vacuum tree
brake vacuum hose from rear vacuum tree
PVRC hose from rear vacuum tree
PVRC hose from fuel lines on the plenum
both fuel hoses
remove the idle air hardpipe
Disconnect hoses along the back side:
water heater hoses (2 x 8mm hoseclamps)
carbon canister from balance tube should already be disconnected
Disconnect hoses along the passenger side:
EGR from rear of engine
EGR from throttlebody
EGR from plastic turbo inlet hose
AIV if equipped
Remove the upper turbo outlet hardpipes (2 x 8mm hoseclamps, 2 x 10mm bolts),stuff rags in openings
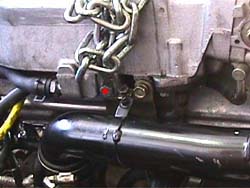
9. Attach engine slingers
Use longer bolts to fit in the rear hole of the side plenum brackets (2x 12mm)
Attach chains to sides of engine (1. & 2.)
Remove motor mount nuts (2 x 14mm)
Lift up engine weight
10. Remove Oil Cooler Lines
Unbolt both clamps from oil filter side of oil pan (2 x 8 mm clamps)
11. Disconnect Steering (not required, but can make things easier)
Unbolt the steering u-joints, remove both bolts (2 x12 mm)
Slide joints upward to come off steering rack
Make sure not to move plastic indexing piece on lower splines
12. RemoveExhaust
Remove cross brace (4 x 12mm)
Disconnect AIV hoses from the exhausts if it's a '90-'92. (2 x 8 mm hoseclamps)
Unbolt presilencer/H or X pipe from mufflers (hardware depends on exhaust,4 x 17 mm nuts/bolts for stock)
Unbolt pipes from pre-cats (6 x 13/14 mm depending upon year)
Remove nuts on hanger brackets at the end of transmission (2 x 12 mm nuts)
Remove entire center exhaust assembly
Remove heat shielding (2 x 10mm bolt 4 x 10mm nuts)
13. RemoveDriveshaft
Put transmission in neutral, leave parking brake on
Drop driveshaft support bearing mount (2 x 19mm, don't loose the spacerson them)
Remove bottom bolts in the middle of driveshaft (2 x 17mm)
Release parking brake, rotate driveshaft 180, set parking brake again
Remove bottom bolts in the middle of driveshaft (other 2 x 17mm)
Separate the driveshaft halves
Remove front half from the transmsission
14. Removethe Starter
Remove the clutch slave cylinder (2 x 14mm)
Disconnect starter (1 plug, 1 x 12mm nut)
Remove small heat shield window (2 x 10mm)
Remove starter (1 x 14mm bolt, 1 x 14mm nut)
15. Removethe Transmission
Disconnect 3 plugs on passenger side of transmission
Disconnect shifter bracket (4 x 12mm)
Disconnect shifter (1 x 12mm bolt, 1 x 12mm nut)
Set up the transmission jack, or whatever bracing deemed necessary
Remove bolts on rear transmission mount (6 x 14mm)
Remove bolts on transmission bellhousing (10 x 14mm)
Note:A36" long 1/2" drive socket extension with a swivel on the end and a 14mm 6 point shallow well socket all on an impact wrench will make this MUCH easier. Just shoot at the bolts from the back of the transmission.
Disengage transmission mainshaft from the engine and lower to the ground
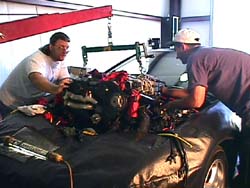
16. Hoist Engine
Use engine hoist to pull out the engine
Disconnect wastegate actuator hoses
17. Re-installing engine is basically a reverse of above steps 16-1.
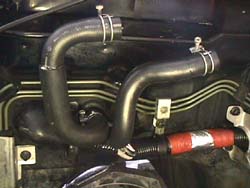
Notes:Install new water heater lines on the firewall. Notice the clamp orientation, this is very important so they can be easily tightened when the engine is backin place (3.).
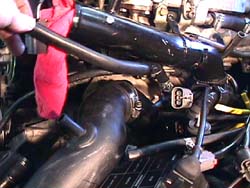
When dropping the engine back in be extremely carefull not to snag any wiring aroundthe sides, the AC lines on the passenger side, or crush the power steeringlines on the steering rack (4.).
I already put the lower low pressure intake plastic pipes back on the chassis before hand.Just leave the clamps snug on the front. While the engine is being lowered into the chassis, guide the intake inlets on the turbos into these hoses(5.).
There are also some alternate methods for engine removal. The engine and transmission can be removed together. This entails all the above steps, except Step15 and the addition of using the Nissan engine slingers and locations.The plenum method of slinging the engine above WILL NOT hold all the weight of the engine plus the transmission, and on top of that, everything would be FAR out of balance. The other problem is the front steering crossmember must be lowered to get the oil pan clear to exit:
Unbolt rear of each front tension rod (4 x 17mm)
Get all powersteering lines loosened from rack
Drop front suspension crossmember (4 x 19mm)
It drops down another 6 inches to gain clearance.
While this makes it sound easier, it's really not as I discovered when I pulled myfirst engine. Dropping the front suspension crossmember will almost certainly ruin the car's alignment. Keep in mind you'll have to support 3 things at once now. The chassis on jackstands, the engine on the hoist, and the suspension crossmember on a jack. There's very little room under the car now with all this hardware in the way. Given all the options, dropping the transmission becomes the easiest to do. You can leave the front wheels on ramps to give a lot of elbow room, the rear of the car on jackstands.I've also seen professional mechanics skip all the front fo the engine parts (PS pump, AC compressor, etc) and just break open the lines, removing all accessories with the engine. This is a big time saver, but most of us don't have the tools to recharge the AC lines, etc. For the DIYer, take the extra time to do it.
Revised: 6-22-2003 |