| As a regular wear item, eventually the clutchand other relevant parts will have to be replaced. OEM parts work finefor an OEM powered car. Stage III will overpower the stock setup in notime (my clutch lasted all of 2 days). Part of the modification pathwayis keeping the car well rounded. Beefy brakes for more HP makes sense,like a beefier clutch will be required for higher HP Zs. There's a fewancillary items that should be replaced at the same time. At the very least,take the time to replace the rear main seal. It's a ~$15 part, but costs$250+ to replace in labor. This procedure goes all the way down and backto basically cover the proper installation of a performance clutch, a performanceflywheel and some other items, like the rear main seal on a '91 TT. Timing: This should be obvious. When the clutch starts slipping under load,it's time to replace it, unless pedal adjustmentwill cure the slippage. Keep in mind the flywheel will need to be resurfacedif the clutch assembly is being replaced. This requires machine work availableat most auto parts stores during regular business hours. Make sure to callahead of time to figure out a plan. There are some easily replaceable alternateparts to consider doing at the same time. Special tools: Clutch alignment tool
3' long x 1/2" extension
14 mm short socket in 1/2"
1/2" socket swivel Part numbers: OEM friction disc
30100-45P01 NA
30100-45P11 TT
OEM pressure plate
30210-30P00 NA 02/89-09/93
30210-45P01 NA 09/93+
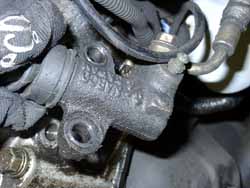
30210-45P05 TT
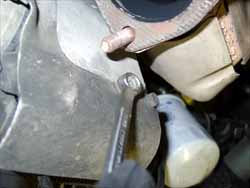
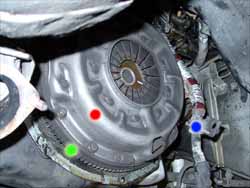
OEM flywheel
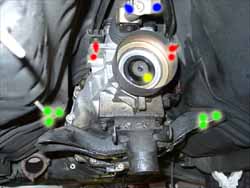
12310-30P13 NA 02/89-07/95
12310-54P00 NA 07/95+
12310-30P12 TT 07/89-07/95
12330-54P10 TT 07/95+
30502-45P00 throw out bearing
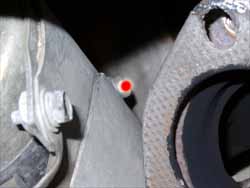
32202-B9500 pilot bushing
12279-0M300 rear main seal
30537-40P00 clutch fork pivot ball Alternate replacement parts: 30531-01500 clutch fork
32136-01G10 rear transmission seal TT/NA
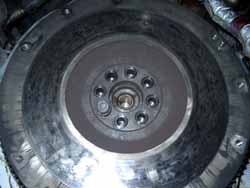
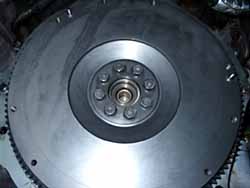
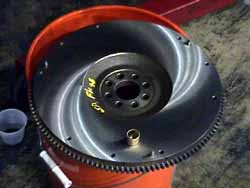
O2 sensors (easy to get to with the transmission out)
22690-30P00 NA pass. 2/89-9/93
22690-46P00 NA pass. 9/93+
22690-30P10 NA driver 2/89-9/93
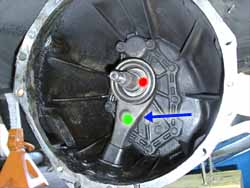
22690-46P10 NA driver 9/93+
22690-30P00 TT pass 7/89-9/93
22690-46P00 TT pass 9/93+
22690-40P10 TT driver 7/89-9/93
22690-48P10 TT driver 9/93+ Procedure: 1. Jack up the car. This can be done on a set of jack stands about 16-18"tall. A lift and a real transmission jack are extremely helpful, but notmandatory. Take all safety precautions necessary. Disconnect the negativeterminal of the battery. 2. Remove the rear undercarriage brace (4 x 12 mm bolts). Removemainexhaust (6 x 14 or 13 mm for precats, 2 x 12 mm for hangers & 4 x17 mm for rear of exhaust). I generally remove the whole center sectionwhich is the main exhaust and the H/X/etc pipe right before themufflers. It's easier to remove those bolts then the ones where thepipes are right next to each other right after the main catalyticconvertors. 3. Remove heat shield above the exhaust (4 x 10 mm nuts & 2 x 10mm bolts). 4. Mark center connection on drive shaft with a paint pen or somethingof that nature to regain proper alignment for balance when re-assembling. 5. Remove drive shaft by dropping the center support bearing (2x 17 mm bolts). Don't loose the spacers/washersthat go in-between the CSB and the body mounts. Then unbolting the twohalves (4 x 17 mm). Manipulating the e-brake with the car in nuetralwill allow easy access to all four bolts when the shaft is rotated.Separate the drive shafthalves at the U-joint and pull the front half out of the transmission.Stuff a shop rag in the end of the transmission to catch any fluid. 6. Disconnect the 3 electrical connections on the passenger side ofthe transmission: the speed sensor, reverse lamp switch and neutral positionswitch plugs. Loosen the wire harness holders along the way forward on top of the transmission tothe engine. 7. Disconnect the shifter support bracket (red dots in 1.) (4x 12 mm). Disconnect the shifter handle (2 x 12 mm, 1 bolt & 1 nut)(blue dots in 1.) from the shifter linkage on the transmission. 8. Remove the passenger precat. Note: This makes getting thestarter out easier and working with the transmission easier as well. Althoughthis step may be skipped. It's advised to have a 14 mm 'stubby' wrenchto get to the top starter bolt if the precat is not removed. Remove the battery. Unplugthe O2 sensor from the wiring harness on the side of the plenum. Unclipthe O2 wire from it's holder on the back corner of the engine so the entirewire is free. Then remove the side heat shield bolt on the precat locatedadjacent to the top two precat bolts (1 x 10 mm), then the top two 13 mmbolts & finally the bottom two 13 mm nuts. Remove the precat from theturbo. Be careful not to ding the O2 sensor. refer to the Precat Guttingpage for more details. 9. Remove the clutch slave cylinder (2 x 14 mm) (2.), loop itback around to hang on the front suspension on it's rubber line to getit out of the way. 10. Remove the power lead to the back of the starter (1 x 12 mm nut)(3.). Disconnect the thin starter relay wire, it's in front of thestarter. Remove the wiring bracket on the side of the engine to get thestarter off (1 x 10 mm). The back half is under the starter's bolt.If the passenger precat is removed, skip this next part. Unbolt the heatshield 'window' (2 x 10 mm) (4. and the upper bolt is the red dotin 5.). This allows enough space to get the starter around the precatif it's still installed. Remove the starter (2 x 14 mm, 1 nut and 1 bolt)and wiring bracket. 11. Remove the transmission bell housing bolts. This issimplified witha 3' x 1/2" extension, a 1/2" swivel and a short 14 mm 1/2" socket. Puta floor jack's lift cup under the transmission drain plug to hold thetransmissionin place. This is roughly the balance point for the entire weight ofthe transmission, keep it here to make the next step work out properly.Remove the bolts on the driver side of the transmission mount(3 x 14 mm bolts) (green dots in 1. on the left), slightly loosenthe 3 bolts on the passenger side (3 x 14 mm bolts) (green dots in 1.on the right). Slowly lower the transmission until the mount dropsas far as the bolts allow it to. Keep the jack in place to support thetransmission's weight. This give just enough space to get the extensionup to the top bolt on the driver side. Picture 1. illustrates. Theangle is with the extension going in just ahead of the rear transmissionmount. Remove all 10 bolts. The topmost bolt on the passenger side hasthe battery ground loop on it (blue dot in 7.). Some bolts go fromthe engine into the transmission as well. 12. Lift the transmission back up with the jack. Remove the lower bellhousing front plate so it doesn't fall out when removing the transmission.Remove the other 3 mount bolts (3 x 14 mm bolts) (green dots in 1. onthe right). The transmission is basically held up by the jack and wherethe main shaft is going into the pilot bushing on the rear of the crank.I can do this without a transmission jack or any straps etc. If thingsfeel uncomfortable, please use whatever safety straps, etc. needto get the confidence level up. Understand the transmission has to comestraight back about 6" before it can be lowered. The transmission weighsabout 85 lbs wet and if done properly, the jack will do all the work oflowering it down. Otherwise it could cause serious injury if it'sallowed to fall. It's a process of the assistant slowly lowering the jacka little bit at a time, while the transmission is slowly pulled backwards.Be very careful, as the speed sensor (the black short round thing stickingout of the top side of the transmission) will definitely try to smash intothe transmission hump. Keep an eye on it and if it's clearing, then everythingelse should work out. The transmission will finally get free of theengine. Pull the transmission backward until there's about 2' ofclearance in the front side. This should be enough room to work on theclutch etc. without having to get the transmission off the jack and outfrom under the car. Note: I cannot stress enough how something thissimple can be extremely dangerous. Consider dropping an 85 lb weight directly on anythingclose by and what injury could result from having it drop on an arm,leg, or a head. Again, if this is uncomfortable, add straps, blocks, a real transmissionjack, whatever it takes to make the work space safe for everyone involved. 13. With the jack lowered all the way, block up the transmission soit won't roll off the jack, they like rolling over on the passengerside. Remove the fork (green dot in 6.) and throw out bearing assembly(red dot in 6.), pay attention to how the spring clips on the forkare holding things in place. Remove the pivot ball under the fork (bluearrow in 6.) (1 x 17 mm). Press the bearing out of the throw outhub in a vice. Press the new throw out bearing in place, making sure it'sgoing right side on. Use a large socket to carefully tap the bearings in& out. Make sure it rotates easily after installing. 14. Replace the pivot ball (1 x 17 mm). Torque to 21 ft-lbs. Lubricatethe ball end with lithium grease. Fill the shallow groove area on the throwout bearing assembly with lithium grease. Do not use too much, just makethe inside diameter smooth with extra grease. Over lubrication will getslung somewhere in the bell housing and the #1 location is onto the clutchassembly. Absolutely not good. Reassemble the fork/pivot ball/throw outbearing making sure all the spring clips are back in place. One clampson the pivot ball in the fork and the other holds the throw out bearingassembly on the fork. 15. Remove the pressure plate and friction disk on the clutch (red dotin 7.) (9 x 12 mm bolts). be careful, there's 3 small dowel pinsholding it in place on the flywheel (green dot in 7.), but oncethe bolts are out, the pressure plate will want to push off of the flywheel& fall off. Be ready for things to fall out and hit the floor, tryto keep anything from doing just that. Remove the pressure plate and frictiondisk. Also, if using air tools, then the bolts should all break loose easily.If not, then put a 27 mm socket on the crank pulley bolt on the front ofthe engine and a long wrench handle to hit the floor (if on jack stands),or get someone else to hold the crank in place if on a lift. 16. Remove the flywheel (8 x 14 mm bolts) (green dot in 7.) (8.).It's sitting on the rear of the crank and won't fall directly off. Be verycareful again, as the OEM flywheel weights 23 lbs and has the starter gearteeth on it. It's easy to get cut by them if the flywheel tries to falloff. Remove the flywheel. 17. Use a small chisel and cut the bronze pilot bushing intoseveralsmaller sections until it basically crumbles and falls out. I use amildsteel chisel, which is much harder then the pilot bushing, but muchsofterthen the crank. The chisel is used to cut slots in the bushing until itcollapses. The bronze is very brittle and will break after some abuse.Use brake cleaner to wash all the old bushing remnants out. Test fitthe bushing on the main shaft of the transmission. Sometimes they fitbetter one direction then the other. Orient it the same going into thecrank so the main shaft will fit as easily a possible. Press the newbushing into the rear of the crank using a similar diameter socket. Note: it'sroughly 14 mm. I use a 1/2 to 3/8 socket adapter as my punch tool..Once it's started in the hole, use a plastic hammer face to tap thebushing in until it's flush with the edge of the hole's inner chamfer,it can be pushed too far back into the crank. Note: the copper is very softand will easily distort is struck too hard or a metal hammer is used.Put a thin coat of lithium grease on the inside of the bushing. 18. Use a small straight blade screwdriver and tap it in-between thetop of the block and the rear main seal (9.). Gentle pry the sealout. It comes out surprisingly easily. Make certain to not scratch thecrank's sealing surface. Rub the new rear main seal in motor oil insideand out. Replace the seal and gently tap it into it's seat with a smallpunch. Make sure the retaining spring inside the seal doesn't come outwhile pressing it in place & don't scratch the sealing surface on thecrank. That would be an expensive mistake! 19. If the large backing plate came off the back of the engine, makesure it goes back on now, right side up & front side front (9.)hanging off the two alignment guides. 20. If reinstalling the stock flywheel, it needs to be resurfaced withthe same .008" step for TTs (slightly visible in 10.) and flat surfacefor NAs (11.) before putting a new clutch on it. Unless the frictionparts aren't being replaced (just doing rear main & not replacing eitherclutch component). Hang the flywheel on the rear of the crank and startthreading the bolts on it (8 x 14 mm). Clean the flywheel off with brakecleaner and a clean towel (10.). Keep wiping until all the assemblylube is removed from it. The part is generally coated with a light oilto keep it from rusting. Torque to 61-69 ft-lbs in a skip 2 pattern, makemultiple rotations to make sure all bolts are correctly torqued. Put a27 mm socket on the crank pulley bolt on the front of the engine and along wrench handle to hit the floor (if on jack stands), or get someoneelse to hold the crank in place on a lift. Leave the wrench on the frontfor the next step. 21. Clean off the pressure plate face with brake cleaner and a cleantowel. Keep wiping until all the assembly lube is removed from it (justlike the flywheel). Stick the plastic clutch disk alignment tool in thefriction disk, hang the friction disk out of the pilot bushing by the plastic alignment tool.The springs, etc on the friction disk stick out toward the back of the car.Put the pressure plate on the flywheel, it will only go on in one direction because of the 3 smalldowell pins. Start the 9 boltsto hold the collection to the flywheel. Tighten the bolts in a skip 2/2/3pattern (9 x 12 mm). Make several rounds before torqueing to 25-33 ft-lbs.Remove the plastic alignment tool (should slide out easily). 22. Start lifting the transmission back up into place like itwas removed.Once the transmission main shaft starts getting close to going into theclutch assembly, it will have to be 'stabbed', meaning the 85 lbtransmission'smainshaft will have to be blindly pushed into the pilot bushing. Notnearlyas easy as it might sound. The fit is very low tolerance and the shaftis long enough to necessitate almost a direct shot to make it work.Sometimesthe engine leans forward when the transmission's out making thisharder,sometimes it leans back, etc. In general a second jack will becomeuseful in helping get the angle correct, careful used of the spare tirescissor jack willdo fine. Be patient this is the hardest part of the job. When thetransmissiongets stabbed, it will be obvious as it will go in another 1" or so andclose the distance from the transmission's bell housing to the engine'srear mounts. 23. The front of the transmission should be held in place like it hadbeen earlier, by the main shaft in the pilot bushing. Bolt up the passengerside of the transmission mount loosely & allow it to hang like it hadwhen removing the front mounting bolts. 24. There are 8 bolts of varying length. Line them up and check themaccording to the diagram and table:
| Bolt | Torque ft-lbs. | Length mm (in) | | 1 | 29-36 | 100 (3.94) | | 2 | 29-36 | 55 (2.17) | | 3 | 29-36 | 60 (2.36) | | 4 | 22-29 | 55 (2.17) | | 5 | 29-36 | 25 (0.98) | | 6 | 22-29 | 60 (2.36) | | 7 | 29-36 | 65 (2.56) |
Get the transmission bolted and torqued back on the engine. Don't forgetto get the battery ground loop on it (blue dot in 7.) back on thetop right bolt. Make sure the shifter support bracket is on top of theears on the rear of the transmission and the pivoting nut plates are both down. Jack the transmission back up andget the rest of the mount bolts in (3 x 14 mm). Torque all six to 38-48ft-lbs. 25. Reconnect the electrical sensors on the right side of the transmission(3 plugs). Catch the harness in the holding loops on top of the transmission.Bolt the shifter support bracket back to the transmission ears (4 x 12mm bolts). Torque to 9-12 ft-lbs. If new shifter bushings were purchased,remove the old ones from the shifter handle. Bolt the shifter handle backto the shifter linkage on the transmission (2 x 12 mm, 1 bolt & 1 nut)(blue dots in 1.). Torque to 12-14 ft-lbs 26. Replace the starter (2 x 14 mm, 1 nut and 1 bolt). I could notfind a torque spec in the service manual. If one is found, please e-mailme with it! The best I can think of is 25-35 ft-lbs. Make sure to catchthe electrical harness bracket back under the nut. Connect the electricals:the power lead (1 x 12 mm nut) (3.), the thin starter relay wire.Bolt the heat shield window back in place (2 x 10 mm bolts) if it was removed. 27. Replace the passenger side precat and O2 sensor assembly if it wasremoved. (4 x 13 mm, 2 bolts, 2 nuts). Reconnect and re-clip the O2 sensor. 28. Replace the clutch slave cylinder (2 x 14 mm bolts). Torque to 22-30ft-lbs. 29. If replacing the rear seal on the transmission, do it now (yellowdot in 1.). Replace the drive shaft (4 x 17 mm), make sure the alignmentmarks are in the proper place. Torque the drive shaft bolts to 29-33 ft-lbsfor the NA drive shaft and 40-47 ft-lbs for the TT drive shaft. Bolt the CSB back in place. Don't forgetthe spacers that go in-between the CSB and the body mounts. Torque theCSB bolts to 43-58 ft-lbs. 30. Replace the heat shield (4 x 10 mm nuts & 2 x 10 mm bolts). 31. Replace the main exhaust (6 x 14 or 13 mm, 2 x 12 mm & 4 x 17 mm) usingnew gaskets, reusable metal gaskets or Permatex Copper Ultra Seal silicon.Torque the front nuts to 33-37 ft-lbs, the rear nuts to 32-41 ft-lbs. Replacethe undercarriage brace (4 x 12 mm bolts). 32. Lower the car back to the ground, reconnect the negative terminalof the battery. 33. The clutch pedal will more then likely have to be adjustedafterwards, it will probably be engaging right off the floor. Published 11-17-2000
Revised 10-22-2003 |