| After many years of use, the stock Z32 door handles can succumb to wear and tear. For this technical document, I had broken my lock cam preventing me from unlocking my door with the key. The following article was documented on a '91 5spd TT. Tools:
10mm 1/4" drive socket with extension(s).
10mm open end wrench.
#2 Philips screwdriver.
Needle Nose Pliers.
Flashlight Parts needed:
Replacement parts are to be determined upon removal and inspection.
Nissan only sells complete door handles which include everythingneeded. Color matched door handles are roughly $150.oo US dollars each. * I was able to disassemble a door handle from a spare door I have, and use it's good parts to replace my broken parts. Similarly, a door or door handle from a salvage yard might have everything needed. Estimated Time Required:
Approximately 2 Hours per door. Procedure:
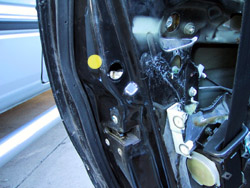
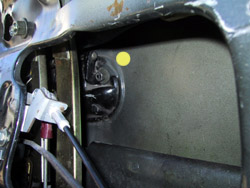
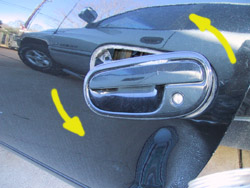
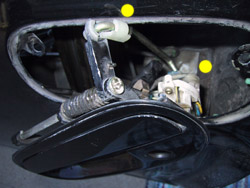
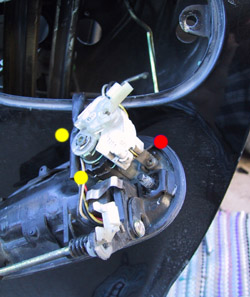
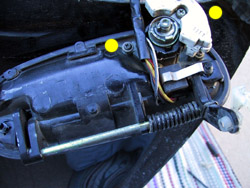
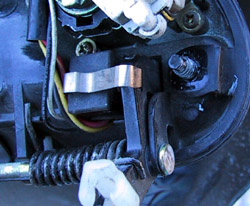
1. To gain access to the door handle, follow this article to remove the door panel; ZHome.com Door Panel Removal Tech(see "removing the front speakers" section). Also, It is important toraise the window completely, so reinstall the driver side windowcontrols before proceeding. 2. Remove the 1" diameter grommet just above the latch mechanism (1.).Using the 10mm 1/4" drive socket, carefully remove the 10 mm nut fromthe door handle. It is necessary to use a thin wall socket to get tothis nut properly. This can be tedious and time consuming. A flashlightis a great aid. Take precautions to not let the nut fall off thesocket, or the socket fall off the extension. 3. Remove the 10 mm nut accessible by using the open end wrench (2.). This will free up the door handle completely. 4. Very carefully, pull the door handle away from the car while twisting it into the approximate position shown (3.).Continue to twist the door handle (carefully!) and lift the door handlemechanism. Lifting the door handle will free the upper door handleactuating arm (4.) and allow the door handle assembly to be pulled out of the door. 5. Again, very carefully, remove the actuating rods from their white plastic retainers (4.).The retainers should rotate off of the actuating rods. Breaking eitherof these will effectively ruin any chances of a successful repair ofany part of the door handle. The door handle should now be free, otherthen the wire harness. Note: The entire handle can be removed by disconnecting theharness at the connecter just forward of the seatbelt return mechanismon cabin side of the door. I chose not to as the harness goes throughseveral plastic retaining clips. 6. Remove the door lock cam by removing the C-Clip (upper yellow dot 5.) 7. Remove the vehicle alarm sensor (large white object) by removing the screw (right dot 6.). When removing the alarm sensor, take caution in not bending the metal tab residing within the alarm (red dot 5.). 8. Remove the door lock tumbler. The lock tumbler is held inplace by a large wire spring encompassing the entire barrel of thetumbler (lower yellow dot 5.). 9. Once removed, all that is left is the key hole light switch,and key hole light bezel. Take extreme caution here as the key holelight bezel is usually very fragile. The light bezel is held in placeby the small screw (left dot 6.) Using your index finger, push the light bezel out through the back side (where the lock used to reside). 10. There is no need to remove the key hole light switch. Ourcars from the factory would sense when the door handle was pulled, andwould illuminate the door key hole lights, and the steering column keyhole light. After years of use, the switch can fall out of 'alignment'with it's actuating piece of metal ribbon (7.). Use a pair of needle nose pliers to tweak the metal ribbon until it functions properly again. 11. Reassembly of the door handle is in reverse order and withless difficulty as the actuating arms snap easily back into theirplastic retainers on the handle, once the handle is set in the positionshown (4.). In review, there are 5 servicable parts of the door handle, repaired, or replaced;
a. the full metal door handle housing seen from the outside, including the sprung door handle
b. the key tumbler
c. the key hole light bezel
d. the key hole light switch
e. the factory alarm sensor And as an additional note;
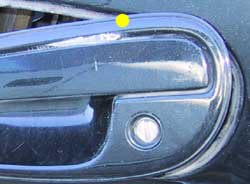
The door handle can not be adjusted to prevent rubbing (8.)as there is no mechanism to allow adjustment. Both the door handle, andthe door handle housing are made of a very hard cast metal (steel?). Itried manipulating the handle with a various tools without success. Originally published 01-15-2003
|