|
This is a rebuild of an SC400 PS pump. The SC400 PS pump is very similar to the LS400 PS pump but it is not exactly the same. The main differences are how the fluid reservoir attaches to the pump itself and the fact that the LS pump has an air control valve while the SC pump does not. I will note the differences throughout this tutorial and so it can be used to rebuild either pump. The only specialty tools needed to do this are a slide hammer, snap ring pliers, and a press. A press is not absolutely necessary, meaning you can get away without using it, but it would be better if you had one. Tools Needed:
Parts/Supplies Needed:

1) Assuming that you know how to get the pump out, put it on a vise. Do not tighten the vise too tight. For LS400 pumps the reservoir tank will still be attached at this point. 
2) Take off the 17mm pulley nut and remove the pulley if you have not already done so during removal. I actually loosened the nut on car while there was still belt tension. 
3) Take off the two 12mm bolts that hold on the oil feed. That's one of my favorite wrenches and it's a Snap-On, one of 2 I own. If you have a LS pump remove the 3 bolts that hold the reservoir tank. Then remove the O-ring from the reservoir tank. 
4) For LS400 pumps only: The arrow in this picture points to where the air control valve is located on an LS pump. Remove the air control valve. It is fairly large and has two prongs sticking out of the end of it. Do not replace the union seat with a new one unless it is damaged. 
5) That is the high pressure oil feed to the rack. Remove the 27mm bolt and then remove the valve and spring, which are located inside. 
This is what's inside, a valve and a spring. 
6) On the other side of the pump remove the snap ring using a snap ring pliers. 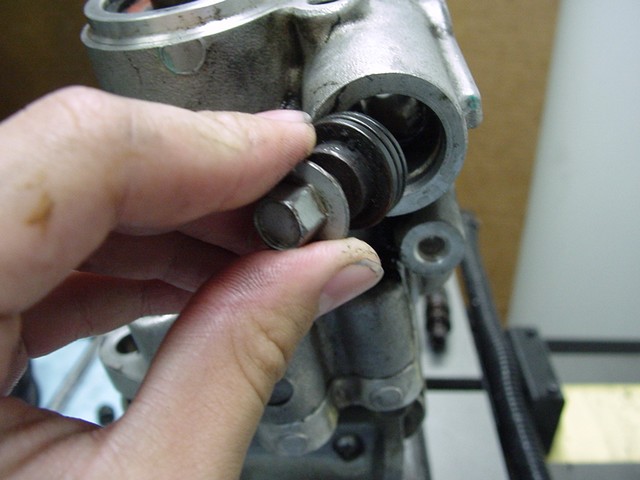
7) Temporarily install a bolt with a 6mm diameter and a 1.0mm pitch in the spring seat and then pull the seat out with a standard pliers. 
8) Using a snap ring pliers, take the snap ring off of the main shaft side. 
9) I scavenged 2 nuts and welded them together then used a slide hammer to pull out the shaft. A nut and washer would work too. If you want to use the Lexus specialty tools, you will specifically need 09911-00011 (puller clamp) and 09912-00010 (puller slide hammer). 
10) Take the four 14mm bolts out of then remove the rear bracket. 
11) Remove the washer and don't loose it. 
12) Remove the front side plate, cam ring, rotor, vane plates, and rear side plate. I used an extension and tapped the pump rotor out with my hand but a hammer may be needed if more force is needed. A press is recommended for this step and may be needed if it doesn't come out by hand. Be sure to have your hand covering the backside to catch the rotor or else it will be a big mess. 
13) Tap the shaft oil seal out with a screwdriver and hammer. 
14) At this point the pump is pretty much disassembled as much as it needs to be. Give it a good solvent bath and clean everything, then dry it off with compressed air or air dry. I cleaned it again with simple green because I feared that it might not be good if the o-rings touched the solvent or residue. Check to make sure the inside is not scratched up. If it is you will need to smooth the inside up. If everything on the inside is smooth then coat the inside with ATF. 
15) Here is the pump rotor and housing. I found it good not to take it fully apart, as it will be a big mess with all the rotor plates. However, make sure it's clean. There are 2 o-rings on each of the 2 side plates. I found that the o-rings were rock hard and I had to cut them off with an xacto blade. 
Here is the seal kit for an SC400. The part # for LS400's is 04446-50011 or 04446-30171 depending on your year, check with your part supplier to confirm the correct #. It's officially called a "gasket kit, power steering pump." 
16) Here is the o-ring I had to cut off. You can kind of tell that it has become brittle over the years of heat cycling and ATF. Replace the two o-rings on the rotor assembly, one o-ring on each side.   17) After washing the pump housing and coating the inside with ATF place the new shaft oil seal in. Use a 22mm socket on top of the oil seal and drive it in with a hammer or a press. Coat the oil seal lip with ATF. 18) Check the bearing to see if it functions smoothly. If necessary, replace the bearing. To remove the bearing, use a snap ring pliers to remove the snap ring. The bearing part # for 90-94 LS400's is 90363-17007.
19) For LS400's only: Check the union seat for the air control valve. If it is broken, tap it out with a hammer and install a new union seat, the part # is 90410-05005. 
20) Coat all sliding surfaces with ATF before assembly. Using a press (or a hammer) drive the shaft back in. 
21) Replace the snap-ring using a snap ring pliers. 
22) Coat the new o-rings on the rotor with ATF and install the rotor housing. Make sure the shaft goes in to the rotor, and use a press (or a hammer) to push in the rotor housing. Be careful not to damage the o-rings while pressing in the housing, then install the wave washer in its grooves. 
23) Install a new o-ring in the rear bracket and coat it with ATF. NOTE: The rebuild kit comes with instructions that say where 3 of the o-rings go, pay attention to that. Then install the rear bracket and torque the 4 bolts to 29 ft-lb (400 kg-cm, 39 N-m).
24) Check that the pump shaft rotates smoothly without any abnormal noise. Temporarily install the pulley nut and check the rotating torque. The rotating torque should be 0.9 in.-lb (1.0 kg-cm, 0.1 N-m) or less. 
25) Replace the o-ring on the spring seat and coat it with ATF. 
26) Install the spring seat with the bolt facing outwards. Using a snap ring pliers, install the snap ring. 
27) Replace the high pressure feed o-ring with a new one. 
28) This is optional. Measure the spring length, the minimum length is 36mm. 
29) Install the spring, valve, and high pressure bolt.  30) Torque the high pressure bolt to 51 ft-lb (700 kg-cm, 69 N-m). 31) For LS400 pumps only: Install the air control valve and torque it to 27 ft-lb (370 kg-cm, 36 N-m). 32) For LS400 pumps only: Replace the o-ring on the reservoir tank and coat it with ATF. Install the reservoir tank with the 3 bolts and torque them to 9 ft-lb (130 kg-cm, 13 N-m).  33) Replace the oil feed o-ring and coat it with ATF.  34) Install the oil feed and torque the 2 bolts to 9 ft-lb (130 kg-cm, 13 N-m).  35) Install the pulley and torque the nut to 32 ft-lb and you're done!!! jzz30 Notes: Now all you have to do is slap that baby back in. I found that over the years of ATF contact and heat the hoses from the oil reservoir and to the steering rack have hardened; now is a good time to order and replace them. Also replace the two hoses that come off of the idle up valve right off of the high pressure feed.
LS400 or SC400 Power Steering Pump
Submitted by xxx@******.com Revision 1 Article submitted on 11 Sep 2010 Last modified on 2 Mar 2011 Viewed 6428 times |
|
|
||||