|
Tundra Spark Plug Replacement Changing spark plugs on the V-8 Tundra is a piece of cake. Only a few tools are needed and it can be done in less than ½ hour. It’s definitely a money saver compared to having a shop or (gasp) dealer do it. Remember, shops and dealerships charge you labor and the make money on the parts. Typically, they charge 2xs the street price of the parts being replaced. Bottom line, anyone who can walk and chew gum (at the same time) can do this service and save money in the process. Service Interval The 2003 and earlier Tundra (and maybe even the 2004 model) use standard Denso K20R-U spark plugs with a 30,000 mile interval. Later models use an iridium plug with a service interval of 100,000 miles. I don’t know the make of the OE plug, but NGK offers this plug as the BKR6EIX. Plug Choice There are many choices out there when it comes to plugs: grooves, u-shapes, v-shapes, split electrodes, 4-electrodes, platinum, iridium, etc. I’m not convinced that there is a performance (HP and TQ) advantage of one over another. The logic behind the platinum and iridium plugs is that they offer extended life and hence, extended service intervals. Note that you can use the iridium plug in place of the standard plug. Can you go the other way around? Probably, but you will have to change the plugs more often. Pricing The OE standard (non-iridium) type plug retails for a little under $3 per plug. The NGK iridium plug is available through Advanced Auto Parts for $6.79 per plug. A quick search on E-bay revealed that the Advanced price is pretty darn good, especially since you don’t have to wait or pay for shipping. I picked up a set of the iridium plugs for my truck. Tools Needed You will need a 3/8” drive ratchet with a 10mm socket and 5/8” or 16mm spark plug socket. A spark plug socket has a special deep well design and a rubber insert to protect the ceramic plug body from cracking during installation. You will also need a 6” or so extension. Make sure to have some Never Seize on hand. A spark plug gap measuring and adjusting tool is also needed. A torque wrench is optional.  Precautions Even though this is an easy job, almost a fool-proof job, you can make a few big mistakes. First, always wait for the engine to cool before changing plugs. The aluminum heads on this motor expand at a different rate from the thread inserts and the spark plug threads. If you change the plugs while hot, you can end up pulling out the thread inserts or gouging the threads. Second, ALWAYS use anti- seize on the spark plugs threads. Failure to do so may cause the steel threads to seize in the thread inserts. Finally, ALWAYS start threading the plugs by hand and run them in by hand (i.e. no ratchet and NEVER use an air ratchet at all!) as far as they will go. IF you do a lot of off-road driving, you may find that there is a lot of sand or other debris on the valve covers. It is VERY important that you blow or wash the valve covers off prior to pulling the plugs. Procedure The process is the same for each of the 8 plugs. 1. Start by checking the gap on the new plugs. The specified gap is .032 inches for our 4.7L V8. To find out what it is for a V6, or more information, check out the NGK website. I found the Iridium plugs came pre-gapped at about .030. The old plugs had a gap between .035 and .038. That alone is a good indication that the old plugs were worn. To check the gap, insert the proper thickness feeler gauge between the side terminal and the center wire. If the gauge slides in with slop, the gap is too wide. You can gently push the spark plug electrode against the bench top or whatever to close the gap. Most sparkplug feeler gauges have a notch in them used to “grip” the electrode so you can bend it out or in. If the feeler won’t fit in the gap, you’ll have to spread the gap. If your feeler setup doesn’t have the notch described above, you can use a thin flat-blade screwdriver; just don’t pry against the center wire (Pictures 2 & 3). 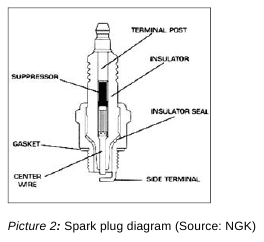  2. Coat the threads on each plug with a small amount of anti-seize. Make sure to keep the anti- seize off the electrode. 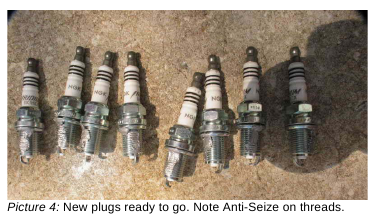 3. We are now ready to R&R the spark plugs. You might want to work on once cylinder at a time. Make sure to clean off any debris from the top of the valve covers. We don’t want any dirt or sand getting down the spark plug tube. Begin by removing the single 10mm bolt holding the coil pack to the cylinder. You don’t need to disconnect the wire harness from each coil pack, but do note that the coil pack wiring is also connected to the injectors. So, when pulling the coils out, make sure that you don’t put a strain on the injector wiring. I pulled on the main harness to get the slack needed to pull the coils out. On the passenger side, I unbolted the injector/coil harness from the intake manifold to get the slack needed. 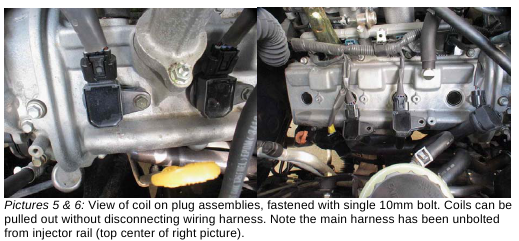 4. With the coil removed, look down the plug tube and make sure that there is no debris or sand that might fall into the cylinder when the plug is removed. Attach the extension to the 5/8” plug socket and ratchet and remove the plug. Pull the plug out of the hole. The plug should “stick” in the rubber in the socket. 5. Inspect the old plug carefully (see Picture 3). You are looking for oil on the body of the plug, damage to the plug threads, damage to the electrode, or deposits on the plug electrode. Oil on the plug body indicates that the valve cover seal is leaking. Consider replacement. Damaged threads or a smashed side terminal means your day is over. If you can, get the plug back into the truck and drive to your favorite repair shop (assuming the truck runs). Deposits on the electrode need to be diagnosed. Oil fouling is a sign of bad valve guides or piston rings. Green or red liquid on the electrode indicates a possible head gasket leak. The electrode should be a light tan or gray and intact. If not, consult a service manual to diagnose the problem. 6. Put the new plug securely into the plug socket. Test to make sure that the plug does not and will not fall out of the plug socket when the socket is flipped upside down. Using ONLY the extension, hand-thread the new plug into the hole. It should start and thread in very easily. If not, thread back out and try again. 7. Once the plug is all the way down, torque the plug by turning the plug about ½ turn. I find it easiest to do two ¼ turns. If you have a torque wrench, torque to 13 ft-lbs. 8. Place the coil back in the hole and make sure it seats properly. The contact in the coil sleeve is spring loaded to ensure contact is made once the coil is tightened. Tighten the coil pack bolt. That’s it. Do this 7 more times and you’re done! Fire up the truck and make sure all is well. The V-6 service is the same except that plug wires are used instead of the coil on plug arrangement. Troubleshooting It’s uncommon to have problems on a job this simple, but some things can go wrong. 1. Plug is stuck in the cylinder. Each plug should come out easily with a 3/8” ratchet. If not, the plug is seized in the cylinder thread insert. Go see a mechanic. 2. Plug unscrews but won’t come out with the socket. The rubber insert in the plug socket is worn, greasy, or just too loose. You can use a section of rubber fuel tubing to “grab” the plug. You can use this same tubing to hand thread the plugs during installation. 3. Plug won’t hand thread into the cylinder. This typically happens if the plug socket is in bad shape and wont hold the plug square in the socket. The plug needs to be perpendicular to the cylinder head/valve cover. Again, consider using a length of rubber fuel line to thread in the plugs. Avoid using “wobble” socket extensions. 4. Plug threads in but will never get tight. This is a bad sign, usually the result of stripped threads. Pull out the plug and inspect the threads for damage. If the plug threads are OK, look down the plug tube and examine head threads. If they are damaged, consider getting a plug thread chaser from the parts store. If that doesn’t work, put the plug in as best you can and go see a mechanic. 5. Engine has a minor misfire not present prior to changing plugs. There are several possible causes. First, there may be contamination (oil or anti-seize) on the electrode. Remove plugs one by one and check for contamination. One or more of the plugs might not have been tightened properly. Back each plug out until loose, hand tighten, then tighten with socket wrench ½ turn. One or more of the coil on plug assemblies may be loose or the wiring may have come off. Check each assembly for proper installation. 6. Engine has a MAJOR misfire. Two of the coil on plug assemblies have been installed on the wrong cylinders. If you do one plug at a time, this is impossible. Examine the wiring harness and make sure that each coil plug is also connected to the injector for the same cylinder. |
|
| ||||