|
A shift light can be a valuable item for almost any driver. Whether you want to have pinpoint shifting while concentrating on a curve while AutoCrossing, or you just want to remind yourself to shift at 5,000 to save gas, there are many reasons to have a shift light. What is a shift light? A shiftlight is a very simple device. All it does is monitor your engine RPM, and light up at a predetermined point. That way you can concentrate on driving, instead of staring at the tach. Many people believe you don't need a shiftlight because you can listen to the engine and shift based on the sound. While this does work to some extent, how many people do you know that can tell the difference between 6,800 rpm at 7,000rpm? Where to get one? Many different companies sell different brands of shift lights. Often times they are generic shift lights that will work with almost any engine. Most import performance shops sell different varieties of shapes, sizes, and applications. Which shiftlight you choose should be based on where you want to mount it, and what type of car you have. Installation Tools: (1) fork cable terminals (1) .250" female slide on connector  Wire tap / Quick Splice  Various size screwdrivers Razor The first step in the installation is finding a place to mount it. This is an important first step, because you have to run your wires accordingly. A few ideas for mounting areas: - On the dash, above the gauge bezel. - On the steering wheel column - In the tray below the stereo    Attach a fork terminal to the end of the ground wire (black wire). This will make it easier to mount and secure. I used a bolt located behind the clutch. Just loosen the bolt enough where you can slide the fork terminal underneath then tighten. At this point the light should have power when the ignition is turned. Some lights will flash briefly when they initially receive power. Try turning the ignition to give power to the accessories and see if it flashes. If it doesn't, don't worry it doesn't mean their is a problem. Finally its time to wire the RPM signal wire. There are two good places to attach the wire too. Behind the gauge clusters themselves, and in the engine bay by the master cylinder reservoir Which you choose is a personal preference. The advantage to the engine bay wire, is it is terminated by an empty plug, so you won't have to tap into the wire like the gauge cluster. GAUGE CLUSTER WIRE If you want to tap into the gauge cluster wire, you will first need to get access.  Under the outerplastic of the gauge cluster, there are two screws. Remove them, and then pull the plastic up and out. It might be difficult at first, but it will come out. From there you have three screws to remove, pictured below.  . Look specifically at the one that plugs into the RPM gauge area. On that plug there is a blue wire with silver dots on it. That is the RPM signal. That is the wire you are going to tap into with a wire tap. The wire tap is pretty straight forward, put the shift light wire in the shorter of the two tunnels, and the blue RPM wire in the longer of the tunnel. Then close the wire tap, and tighten it shut with a pair of pliers. Reinstall the gauge cluster and its housing and you are done.  ENGINE BAY WIRE  In order to reach the engine bay, you are going to have to cut a small slit in the rubber grommet under the dash, and feed the wire through. The easiest way to do this, is cut a small slit from the engine bay. Then straighten out a clothes hanger and feed it through. Then attach the shift light wire on the inside with tape. Pull the hanger out and the wire with come with it. Luckily the wire will come out right next to the RPM signal wire we are going to use. Once you have cut a slit, and run the wire through, identify the rpm signal wire. It is blue terminated wire, and it will be taped to the harness. Connect the two wires, and you are done. 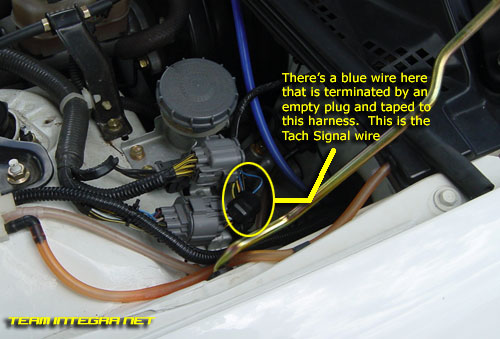 Submitted by xxx@******.com Revision 1 Article submitted on 4 Jul 2011 Last modified on 4 Jul 2011 Viewed 3985 times |
|
|
||||