|
MATERIALS NEEDED: - socket set - No. 3 phillips head bit - jack and jack stands - brake pad grease - some strong string OPTIONAL MATERIALS: - wrench CLEANING MATERIALS: - WD-40 - brake cleaner/degreaser INSTRUCTIONS: 1. Loosen the lug nuts on the front wheels. 2. Jack up the front of the car with a jack. (look for an arrow etched in the plastic to see support point) 3. Put jack stands under the sides of the car. (remember to make it so the wheels are off the ground slightly) 4. Remove the lug nuts completely and take off the wheels. 5. To do the passenger side of the car first turn the wheel all the way to the left. SEE OPTIONAL STEP BELOW 6. Look for two big bolts that hold the caliper to the hub. (circled in blue) 7. Remove the lower bolt first. (remember which way to unscrew) 8. Suspend the caliper using some strong string to the spring. (watch out to not bend the brake line too much) 9. Remove the upper bolt and let the caliper hang from the string. (make sure it's secure) 10. Spray the two phillips head screws holding the rotor to the hub with WD-40. (circled in yellow) 11. Wait for the WD-40 to loosen the screws and use a No. 3 phillips head bit to unsrew them. 12. Tap the old rotors with a hammer if they're stubborn and won't come off the hub. 13. Now clean the rusted parts of the rotor with something that removes rust. (WD-40 is okay) 14. Take out the brake pads from the caliper. They just slip out. 15. Take out this little clip cover on one of the brake pads and clean it. 16. Clean the old pads and rotors. (save them and maybe sell them [IMG]i/expressions/face-icon-small-smile.gif[/IMG]) 17. Clean the caliper using a de-greaser. (dish washing liquid is okay, but specialty brake cleaner is preferable) 18. Clean everything else so that it's spic and span, greaseless, and dry. 19. Now put the brake pad grease on the back of the brake pads. (do not put any on the sides that touch the rotor) 20. Install the brake pads. (remember to include that slip cover you removed from the stock pads) 21. Make sure to clean the rotors of any grease before putting them on. 22. Put on the rotors. (these rotors are directional, remember to put the right one on the right side) 23. After putting on the rotors check again if they have any grease smears on them. (clean as necessary) 24. Put on the calipers. (do not grind any part of the caliper against the rotor) 25. Tighten everything down to specifications. (don't know what that is exactly, going on feel) 26. Before putting the wheels back on pump the brakes lightly a couple of times to seat the brake pads. OPTIONAL STEP: 1. Look for the two smaller bolts that hold the outside part of the caliper closer to the rotor. (circled in red) 2. Try to loosen the bolts; notice that this one part spins. 3. Use a wrench to hold that part in place while you try to loosen the bolts again. The optional step is to loosen how close the brake pads sit to the rotor's surface. You should do this if you have any difficulty removing the caliper from the rotor after unscrewing the two big bolts. The torque specification for these bolts is somewhere around 25 to 30 foot pounds. I reverse engineered this torque specification by adjusting my torque wrench until I could unscrew the bolt. Some people reccomend you break in new rotors using old pads and break in new pads using old rotors. Brembo's instructions state to replace the rotors and pads at the same time, so that is what I ended up doing. 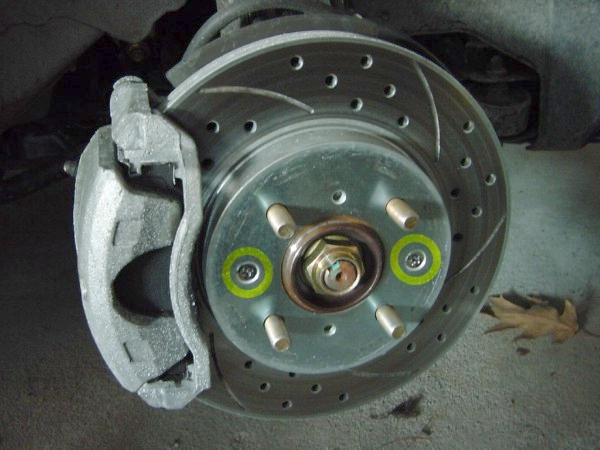  REVIEW: I can compare the effectiveness of the stock brake pads to the AEM/Nissin brake pads since my sister also has a 2001 Honda Civic LX. It takes less pedal effort to get the AEM/Nissin brake pads to start gripping. I also notice that the brake pads work better when they're warmed up. I don't know about the rotors since I have no way of testing them. Although, in theory they should work better than the stock ones do. The holes increase the surface area of the rotor and allow the air to flow through the rotor which increases cooling of the rotor. The slots are there to prevent the buildup of brake dust so that it doesn't form a glaze on the surface of the brake pad. This glaze forms under hard braking and has lower frictional properties than the surface of a non-glazed brake pad. In effect, you will be able to effectively brake longer than before. Submitted by xxx@******.com Revision 0 Article submitted on 4 Jul 2013 Viewed 3208 times |
|
|
||||