Ever feel a vibration only when you're acclerating?
Chances are that you need a new axle. The first thing you'd need to do before you go pulling an axle out of your car is figure out which axle is bad if both aren't. Symtoms of a bad axel would be:
1. Torn boot with grease slinging out. 2. One side or the other vibrating upon hitting the gas. This indicates a broken or worn inner joint.
So after you figure out which one (or both) needs replacing you can begin.
I've taken some pics of various tools that you will need in order to swap an axle. I work at a shop so air was available to me, but for you at home there might not be some tools pictured here that you will need - I'll get to that in a minute.
32mm socket 19mm socket 17mm socket 17mm wrench or additional socket 1/2'' driver for big sockets 3/8'' driver for drain plug/sockets hammer prybar *big-ass breaker/cheater bar for the 1/2'' driver to break the axle nut loose and tighten it back down*
*Optional*
Depending on tranny you might have to drain and fill the tranny. I make this a common practice every time I swap an axle and I recommend that you do too. In my tutorial I will detail how to drain and fill the tranny. If doing so add these things:
3 qts of Genuine Honda MTF (you won't use all 3 - B-Series takes like 2.5 qts.) Long funnel crush washer for drian plug (get it from Honda - same one as your engine oil drain plug) 10mm socket with LONG extention driver for 10mm socket/extension
Here we see the various tools laid out. Missing from the pic is the big-ass breaker car for you at home that will need it for the 32mm axle nut. Also missing are the funnel and 10mm socket.extention/driver combo for the drain/fill procedure. I has air tools available so I used them.
Close-up of cotter pin (you'll only need one) and drain plug washer
Drivers and 17mm end wrench:
32mm, 19mm, and 17mm sockets:
And if you're lucky and have tools a 1/2'' impact will be very helpful:
I think the torque values are as follows, but you'll want to check a service manual to be absolutely sure:
lower control arm to spindle (17mm) = 43lbft
tie rod end to spindle (14mm I think) = 36lbft
shock/damper fork to lower control arm = 36lbft ???
spindle nut = 132lbft
Okay so let's get started.
1. Take the 19mm socket and break your wheel lugs loose. they will be hard as hell to break loose if you've already got the car in the air.
*For those without an impact*
It has been brought to my attention that if you are using a 32mm socket with a 1/2'' driver and a big-ass breaker bat you might want to break the 32mm axle end nut loose while the car is still on the ground. Hopefully you can access the nut with the wheel still on, because if not you'll have to get someone to sit in the car and hold the brakes on with the engine on in hopes that the wheel won't turn while you try to break the 32mm nut loose.
2. Jack up the car and secure it on a STABLE set of jackstands. I used a lift so sorry, no pics.
3. Locate the drain plug and use a 3/8'' driver with no socket and remive the drain plug:
Replace the drain plug washer and tighten the drain plug back after draining is complete. I didn't do this until later on because I waited to drain the tranny until right before prying out the axle, but I recommend doing this first at home and then tightening the plug back until you feel/hear the washer crush. This insures no leakage during work and also so that you remember to drain and tighthen the plug up before you start the real work.
4. Remove the wheel and look for the 32mm axle end nut. Yeah the pic sucks.
5. Remove the axle nut with the 32mm socket. At home you will need a breaker bar or cheater bar to get much-needed leverage to break this bastatrd loose. I used an impact.
6. Now find the cotter pin lovated on the 17mm castle nut below the lower balljoint and remove it by unfolding it with your ****s:
7. Now take the 17mm socket and remove the 17mm castle nut from the lower balljoint. Yes this pic sucks too.
8. Now take your hammer and beat on the lower control arm where the hammer head is in this pic. This will break the balljoint loose. The pics get better sometime.
9. Now locate the through bolt that holds the lower strut "fork" to the lower control arm:
10. Using a 17mm socket on one side and either a 17mm wrench or another socket to hold the other side, remove the through bolt .
11. Now take your hammer and LIGHTLY tap on the end of the axle to get it free from the spindle:
12. Now pull the lower strut fork to the side and it should all look like this:
13. Now you're ready to pry the axle out. Take the prybar and position like so in the pic and pry. You might want to secure the spindle out of the way so it doesn't hold the axle in:
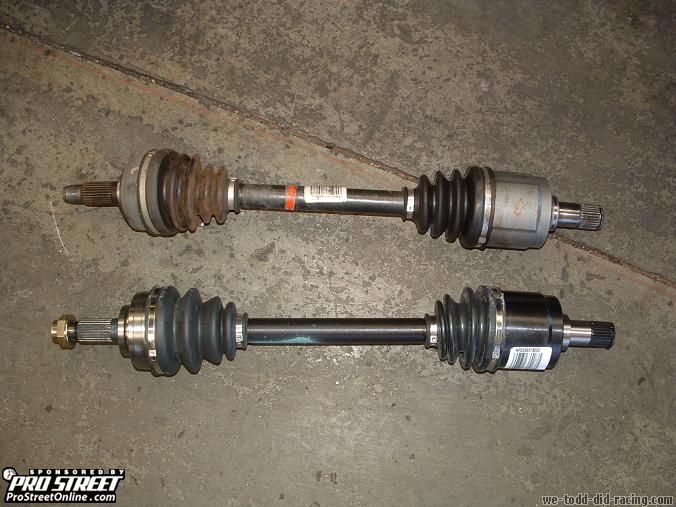
14. Compare your new axle to the one you pulled out and make sure the new axle is correct. The old axle might not "look" bad, but in this case here the shaft is actually broken in half inside the outer boot.
15. Now you're ready to put the new one in. Simply reverse the removal procedure. First get the spindle out of the way and pop the axle back into the inner joint. It might take a bit of pushing, but it will pop in. Make SURE that the inner joint is all the way in and butted up against the tranny casing fully.
16. Here's where steps can be swapped around, but I did mine in this order. Put the lower balljoint back into the lower control arm and slide the outer splines back into the spindle - finger tighten the 32mm axle nut on so the axle doesn't pop back out while you do other work.
17. Now you're ready to line up the lower strut fork with the lower control arm to put the through bolt in. It helps to tighten the lower balljoint 17mm castlenut first. Replace the cotter pin too! VERY IMPORTANT!!! Remember to tighten the 17mm castlenut in a manner so that you can slide the new cotter pin in.
18. Push up on the lower control arm and slide the through bolt in plave and put the 17mm nut on the end:
19. Using two 17mm sockets or whatever combo you choose, tighten the through bolt:
20. Now tighten the 32mm axle end nut. If you have no air tools then use the breaker bar and tighten it up pretty snug. STAKE THE NUT DOWN! Use the hammer and something flat to make an indention in the nut like pictured:
So the new axle is in. Time to fill the tranny. There's a few schools of thought on how to fill the tranny, but this methid here is by far the least messy and to me the easiest.
*Optional* Find the fill plug. It is seen here right next to the inner joint of the axle. It has a crush washer so if you loose it your'e screwed. Honda doesn't usually sotck this one. I chose not to loosen my fill plug because I know my tranny takse 2.5 qts., but the way you fill it is to fill until fluid dribbles from the fill hole so this is optional if it makes you feel better.
Here's where the trick comes in that will save you headahces. Usually you have to ghetto-rig a funnel and tube to fill the tranny in the fill hole which really sucks. My method is really easy.
1. Remove the vent cap found near the front/top of your tranny:
2. Find the Speed sensor located on the topside of the very back of your tranny:
3. Take the 10mm on a big-ass extension and remove the bolt (it's the orangish one in my pic - yours probably won't be oragnish):
4. Now see that big-ass hole left after you move the speed sensor out of the way? Use the funnel and fill through that hole! By the way, no need to unplug the speed sensor - just move it out of the way.
5. Fill up with specified amount or until fluid dribbles from the fill hole below.
6. Put the speed sensor back in, tighten up the fill plug (if you loosened it).
7. Replace the vent cap and you're done!
Now put your wheel back on, torque the lugs to spec with a torque wrench and take your car for a test drive!
How to change your axle(s): Honda Civic/Del Sol (1992 - 2000)
Submitted by xxx@******.com
Revision 4
Article submitted on 14 Jun 2011
Last modified on 7 Jul 2011 Viewed 4099 times
Please enable / Bitte aktiviere JavaScript! Veuillez activer / Por favor activa el Javascript![ ? ]